 Agencies and studios
 Photographers
 Podcasters
 Video and social creators
 Marketers and content teams
What does Ken Burns do?
Ken Burns turns still photos into video with a slow, smooth camera move: a push in on a face, a drift across a landscape, a rise up a building. You pick a move, set how strong it is, and watch it play before you export. Make one video per photo, or join all your photos into one slideshow with transitions and a song. Everything happens on your own computer, and your photos never leave it.
Ken Burns opens as a Studio: a large stage in the middle, a settings panel on the right with the tabs Shot, Speed, Video and Look, and a timeline at the bottom. When you make one video from all your photos, a Sequence tab joins them.
Step 1: Open the Studio and add your photos
Click Tools in the sidebar, open the Create tab and click Ken Burns in the From your media section. The card reads Turn photos into smooth camera moves. You can also type "ken burns" or "slideshow" in the search box at the top.
Drop your photos on the window, or click Drop photos here to pick them. JPG, PNG, WebP, TIFF and BMP photos work. With one video per photo, the strip at the bottom shows every photo. Click one to preview it. To add more, click the plus button (Add files) or the folder button (Add a folder) at the end of the strip. Hover a thumbnail and click its small x to remove it, or click Clear all to start over.
Step 2: Choose one video per photo, or one video from all
The Make switch at the top of the Studio decides what you get:
- One video per photo: each photo becomes its own video, named after the photo with
-ken-burnsadded, for exampleharbor-at-dawn-ken-burns.mp4. - One video from all: every photo joins, in queue order, into one video, named after the first photo with
-sequenceadded, for exampleharbor-at-dawn-sequence.mp4.
When you add two or more photos, Hangar switches to One video from all for you. Once you pick a side yourself, it stays where you put it.
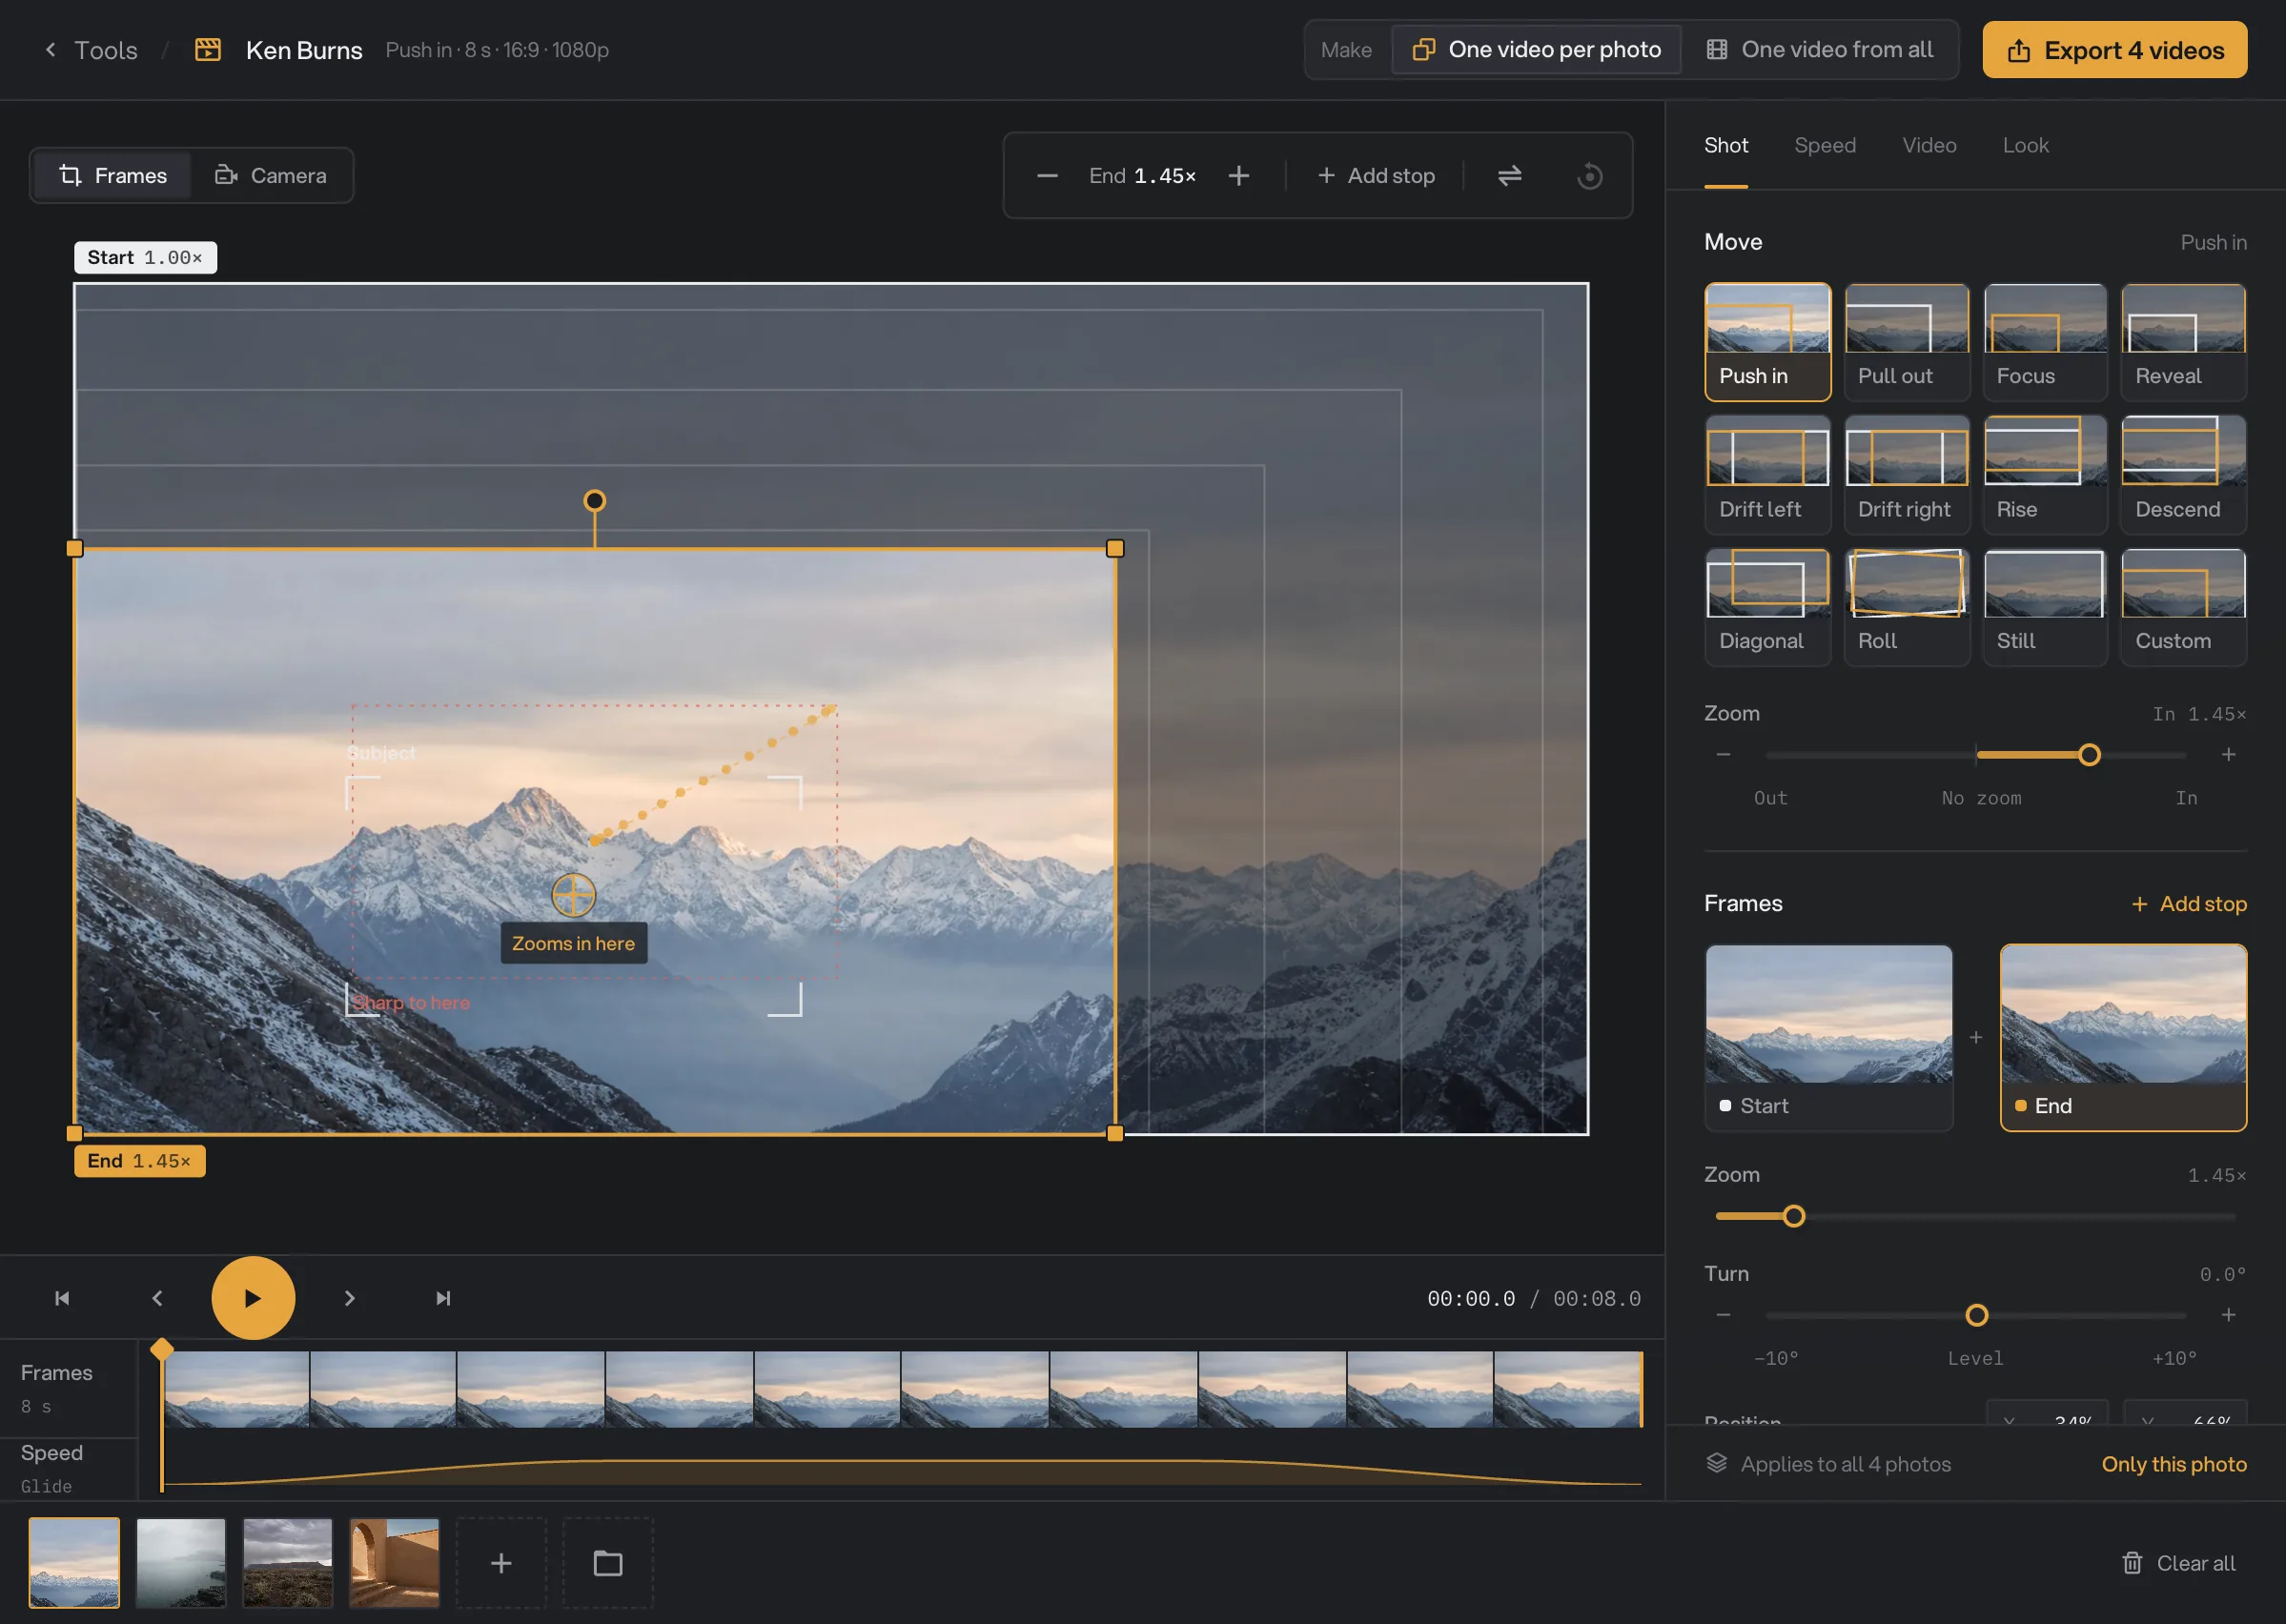
- Make
- Move
- Frames, as the camera sees them
- Where the move goes
- Timeline
- Play
- Export
Step 3: Pick a move
On the Shot tab, under Move, pick one of 12 tiles:
- Push in (the default) moves slowly closer, and Pull out moves slowly away.
- Focus closes in on the subject. Reveal starts close and opens up the whole scene.
- Drift left, Drift right, Rise and Descend glide across the photo. Diagonal travels corner to corner.
- Roll adds a gentle turn. Still holds the frame without moving.
- Custom is your own move. It is selected for you as soon as you change a frame by hand.
Zoom is one slider with No zoom in the middle. Drag right to zoom In and left to zoom Out, or use the − and + buttons; double-click it to reset. The readout shows how much the move zooms from start to end, such as In 1.45×. Push in and Pull out are the two sides of the same slider, so dragging Push in past the middle turns it into Pull out, and Focus into Reveal. Every move except Still and Custom can zoom, so a drift can also push in as it travels. When the photo is too small to stay sharp all the way, the ends of the slider are shaded.
Travel (Drift left, Drift right, Rise, Descend and Diagonal) sets how far the camera travels, and Turn (Roll) how far it turns, from 0 to 100 (40 by default). The readout says Subtle, Gentle, Strong or Bold.
Lands on sets where the move goes. Subject (the default) finds the main subject of the photo on your computer; if nothing stands out, the move goes to the center. Centre always goes to the middle. Your spot is a place you pick: in the Frames view, drag the cross, or click inside a camera frame where you want the move to go. Aiming works for Push in, Pull out, Focus, Reveal, Drift left, Drift right, Rise and Descend. A zoom move goes all the way to that spot, as far as the edges of the photo allow.
Photo shape matters when a photo’s shape differs from the video, such as a tall photo in a wide video. Fill (the default) crops the photo to fill the frame. Blurred shows the whole photo on a blurred copy of itself. Colour shows the whole photo on a color you pick, black by default.
Step 4: Shape the move on the photo
The stage has two views. Switch between them with Frames and Camera at the top of the stage.
Frames shows the whole photo with the camera’s frames drawn on it: the Start frame in white, any stops as dashed frames, and the End frame in amber. Faint frames in between show the path, and a dotted line shows the speed: dots far apart mean the camera moves fast there. When a move lands on the Subject, the subject Hangar found is outlined with corner marks.
- Scroll over the photo to zoom the selected frame toward the pointer: the spot under the pointer stays put, like zooming a map. The − and + buttons at the top of the stage zoom it from its middle. On the stage a frame can zoom up to 8×; the Zoom slider on the Shot tab stops at 4×.
- Drag a frame to move it. Drag a corner to zoom in or out; the opposite corner stays where it is.
- With Push in, Pull out, Focus, Reveal, a drift, Rise or Descend, a cross shows where the move goes. When the move zooms, it is labeled Zooms in here or Zooms out from here. Drag the cross, or click inside a frame, to aim the move there.
- A dashed coral outline labeled Sharp to here shows how far the photo can zoom and stay sharp.
- When Keep sharp is holding a move back, a note under the stage says so, such as "Keep sharp holds the zoom at 1.6× for this photo". Click Sharpness in the note to open its setting.
- Drag the dot above a frame to turn it, up to 10° either way.
- Double-click the photo, or click Add stop, to add a stop the camera passes through. You can add up to 4 stops, 6 frames in all. To remove a stop, select it and press Delete.
- Swap start and end plays the move the other way around. Back to the move drops your own frames and returns to the move you picked.
On the Shot tab, Frames shows each frame as a small picture of what the camera sees, from Start through any stops to End. Click one to select it, or click the + between two to add a stop there. Under the pictures, the selected frame has its own Zoom (1× to 4×), Turn (−10° to +10°) and Position (X and Y as a percent of the photo), for exact values. A stop also has Remove this stop. Once there are stops, Path appears: Straight goes from frame to frame in straight lines, and Curved glides smoothly through the stops.
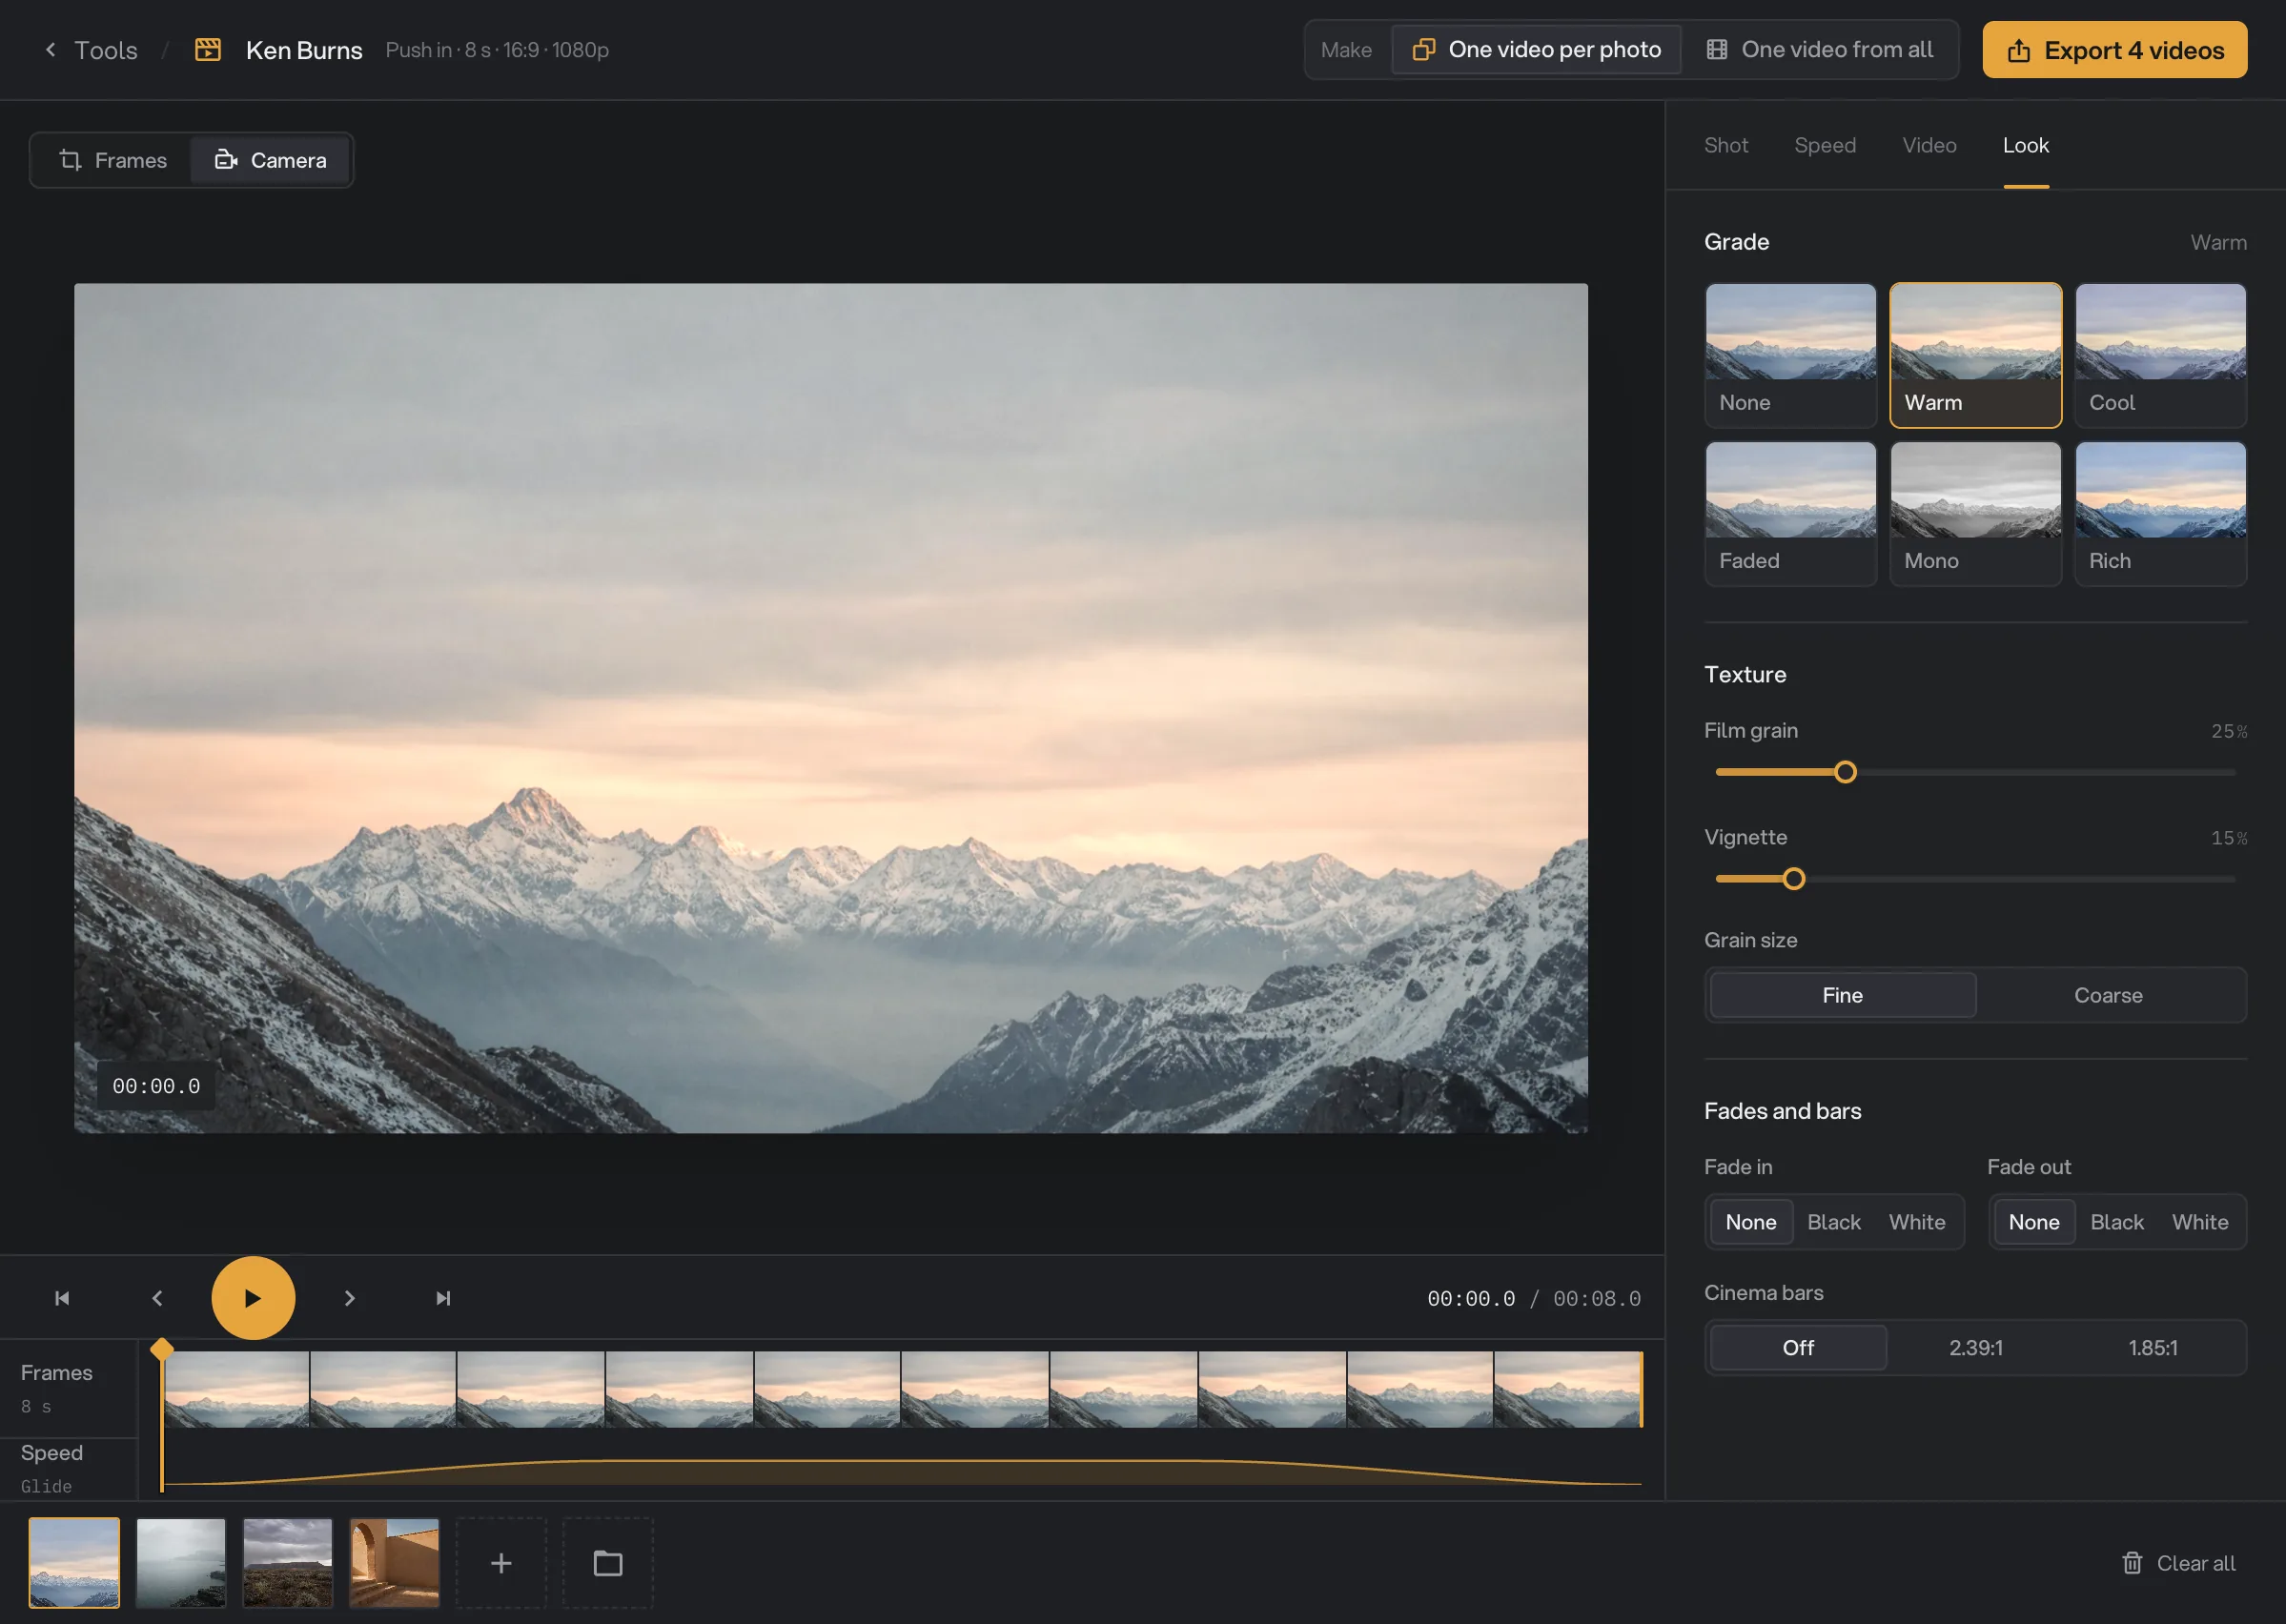
Camera shows exactly what the video shows at the playhead, with a timecode, and the transition’s name while a transition plays. Press Space to play or pause; it switches the stage to Camera if you were on Frames.
Step 5: Set the speed and timing
On the Speed tab, pick a curve:
- Glide (the default): eases in and out, and keeps a steady pace in the middle.
- Ease: a slower start and end.
- Steady: the same speed all the way.
- Custom: drag the two handles on the graph to set Ease in and Ease out, shown as percentages.
The graph shows how far along the move the camera is over the shot’s time, with the hold zones and the stops marked on it.
Under Timing, set the Length of the shot, from 1 to 60 seconds (8 seconds by default). Hold at start and Hold at end keep the camera still for up to 5 seconds before and after the move. Play backwards runs the move from end to start. Loop back to the start goes out and comes back, so the video ends where it began.
With several photos, a line at the bottom of the Shot and Speed tabs says what your changes apply to: Applies to all 4 photos, for example. Click Only this photo to change only the selected photo, which then keeps its own settings; the line then shows that photo’s name. Click Reset to drop its own settings, or All photos to change every photo again. A change made for all photos also reaches a photo with its own settings: that photo takes the new value and keeps its other own settings.
In One video from all, the line starts on the photo you selected on the timeline, such as Only alps-morning, so each photo can get its own move. Click All photos to change them all at once.
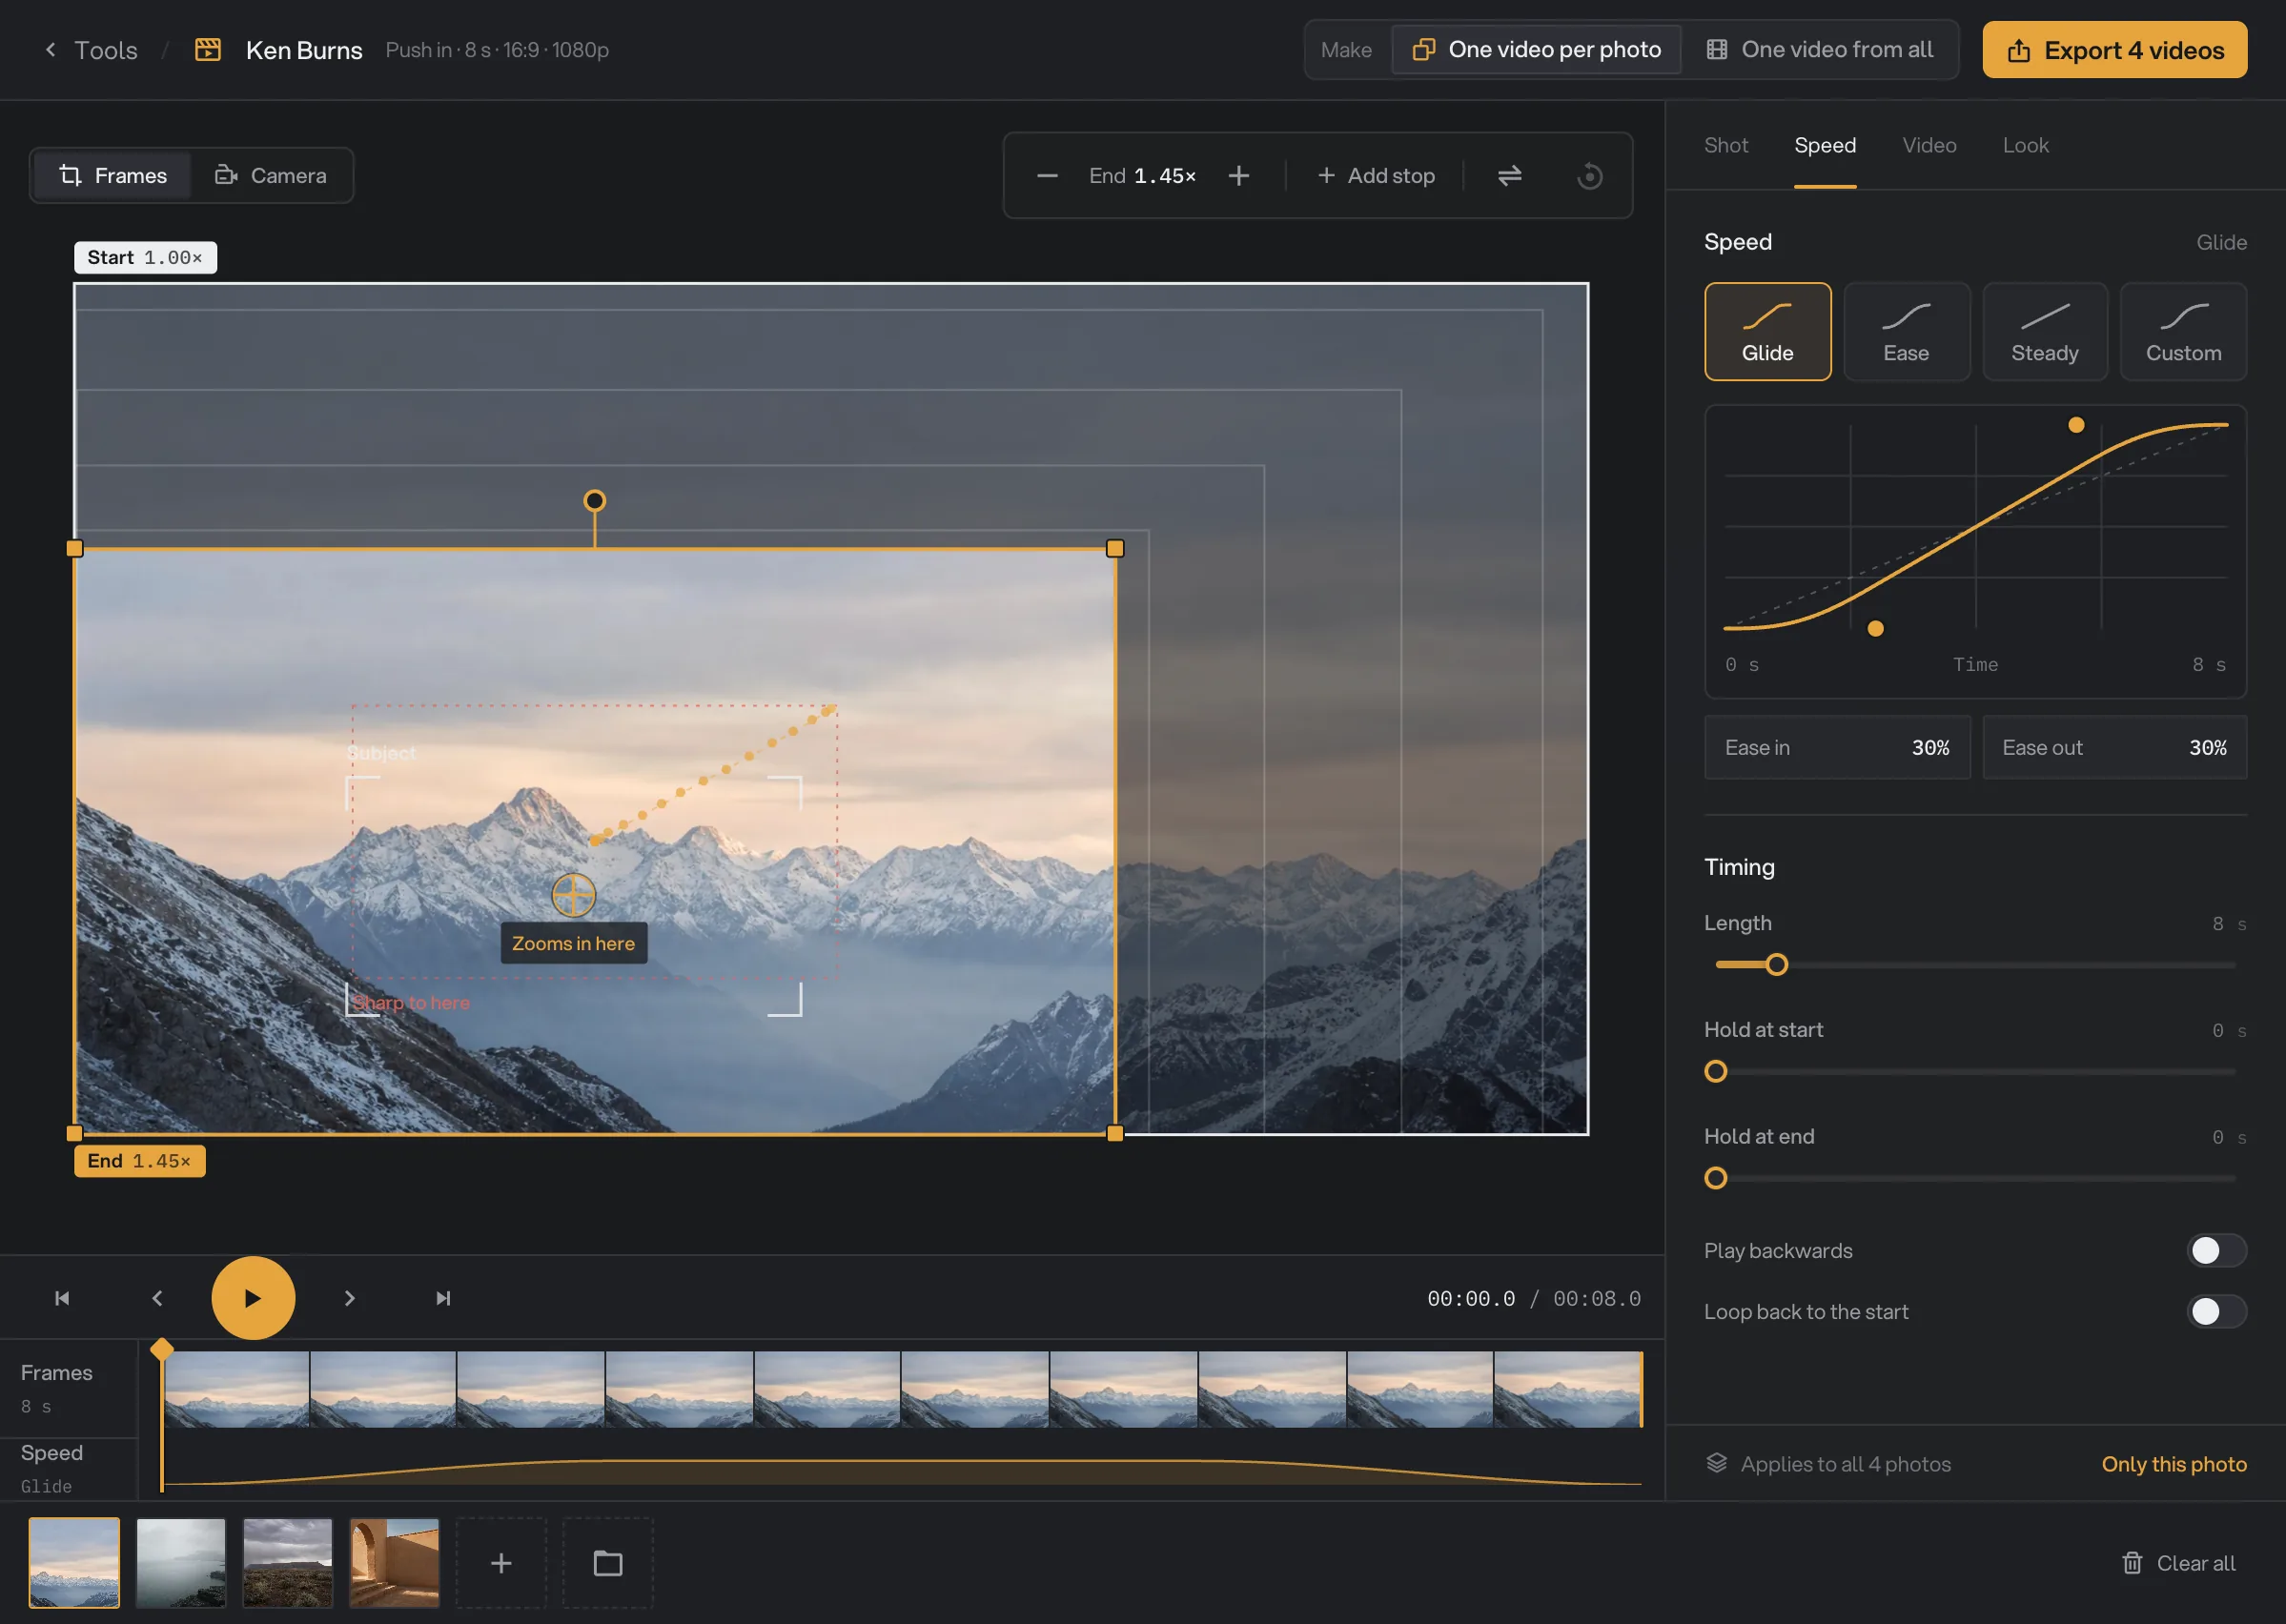
- Speed curve
- Ease in and Ease out
- Length
- Holds
- Only this photo
Step 6: Build a slideshow with music
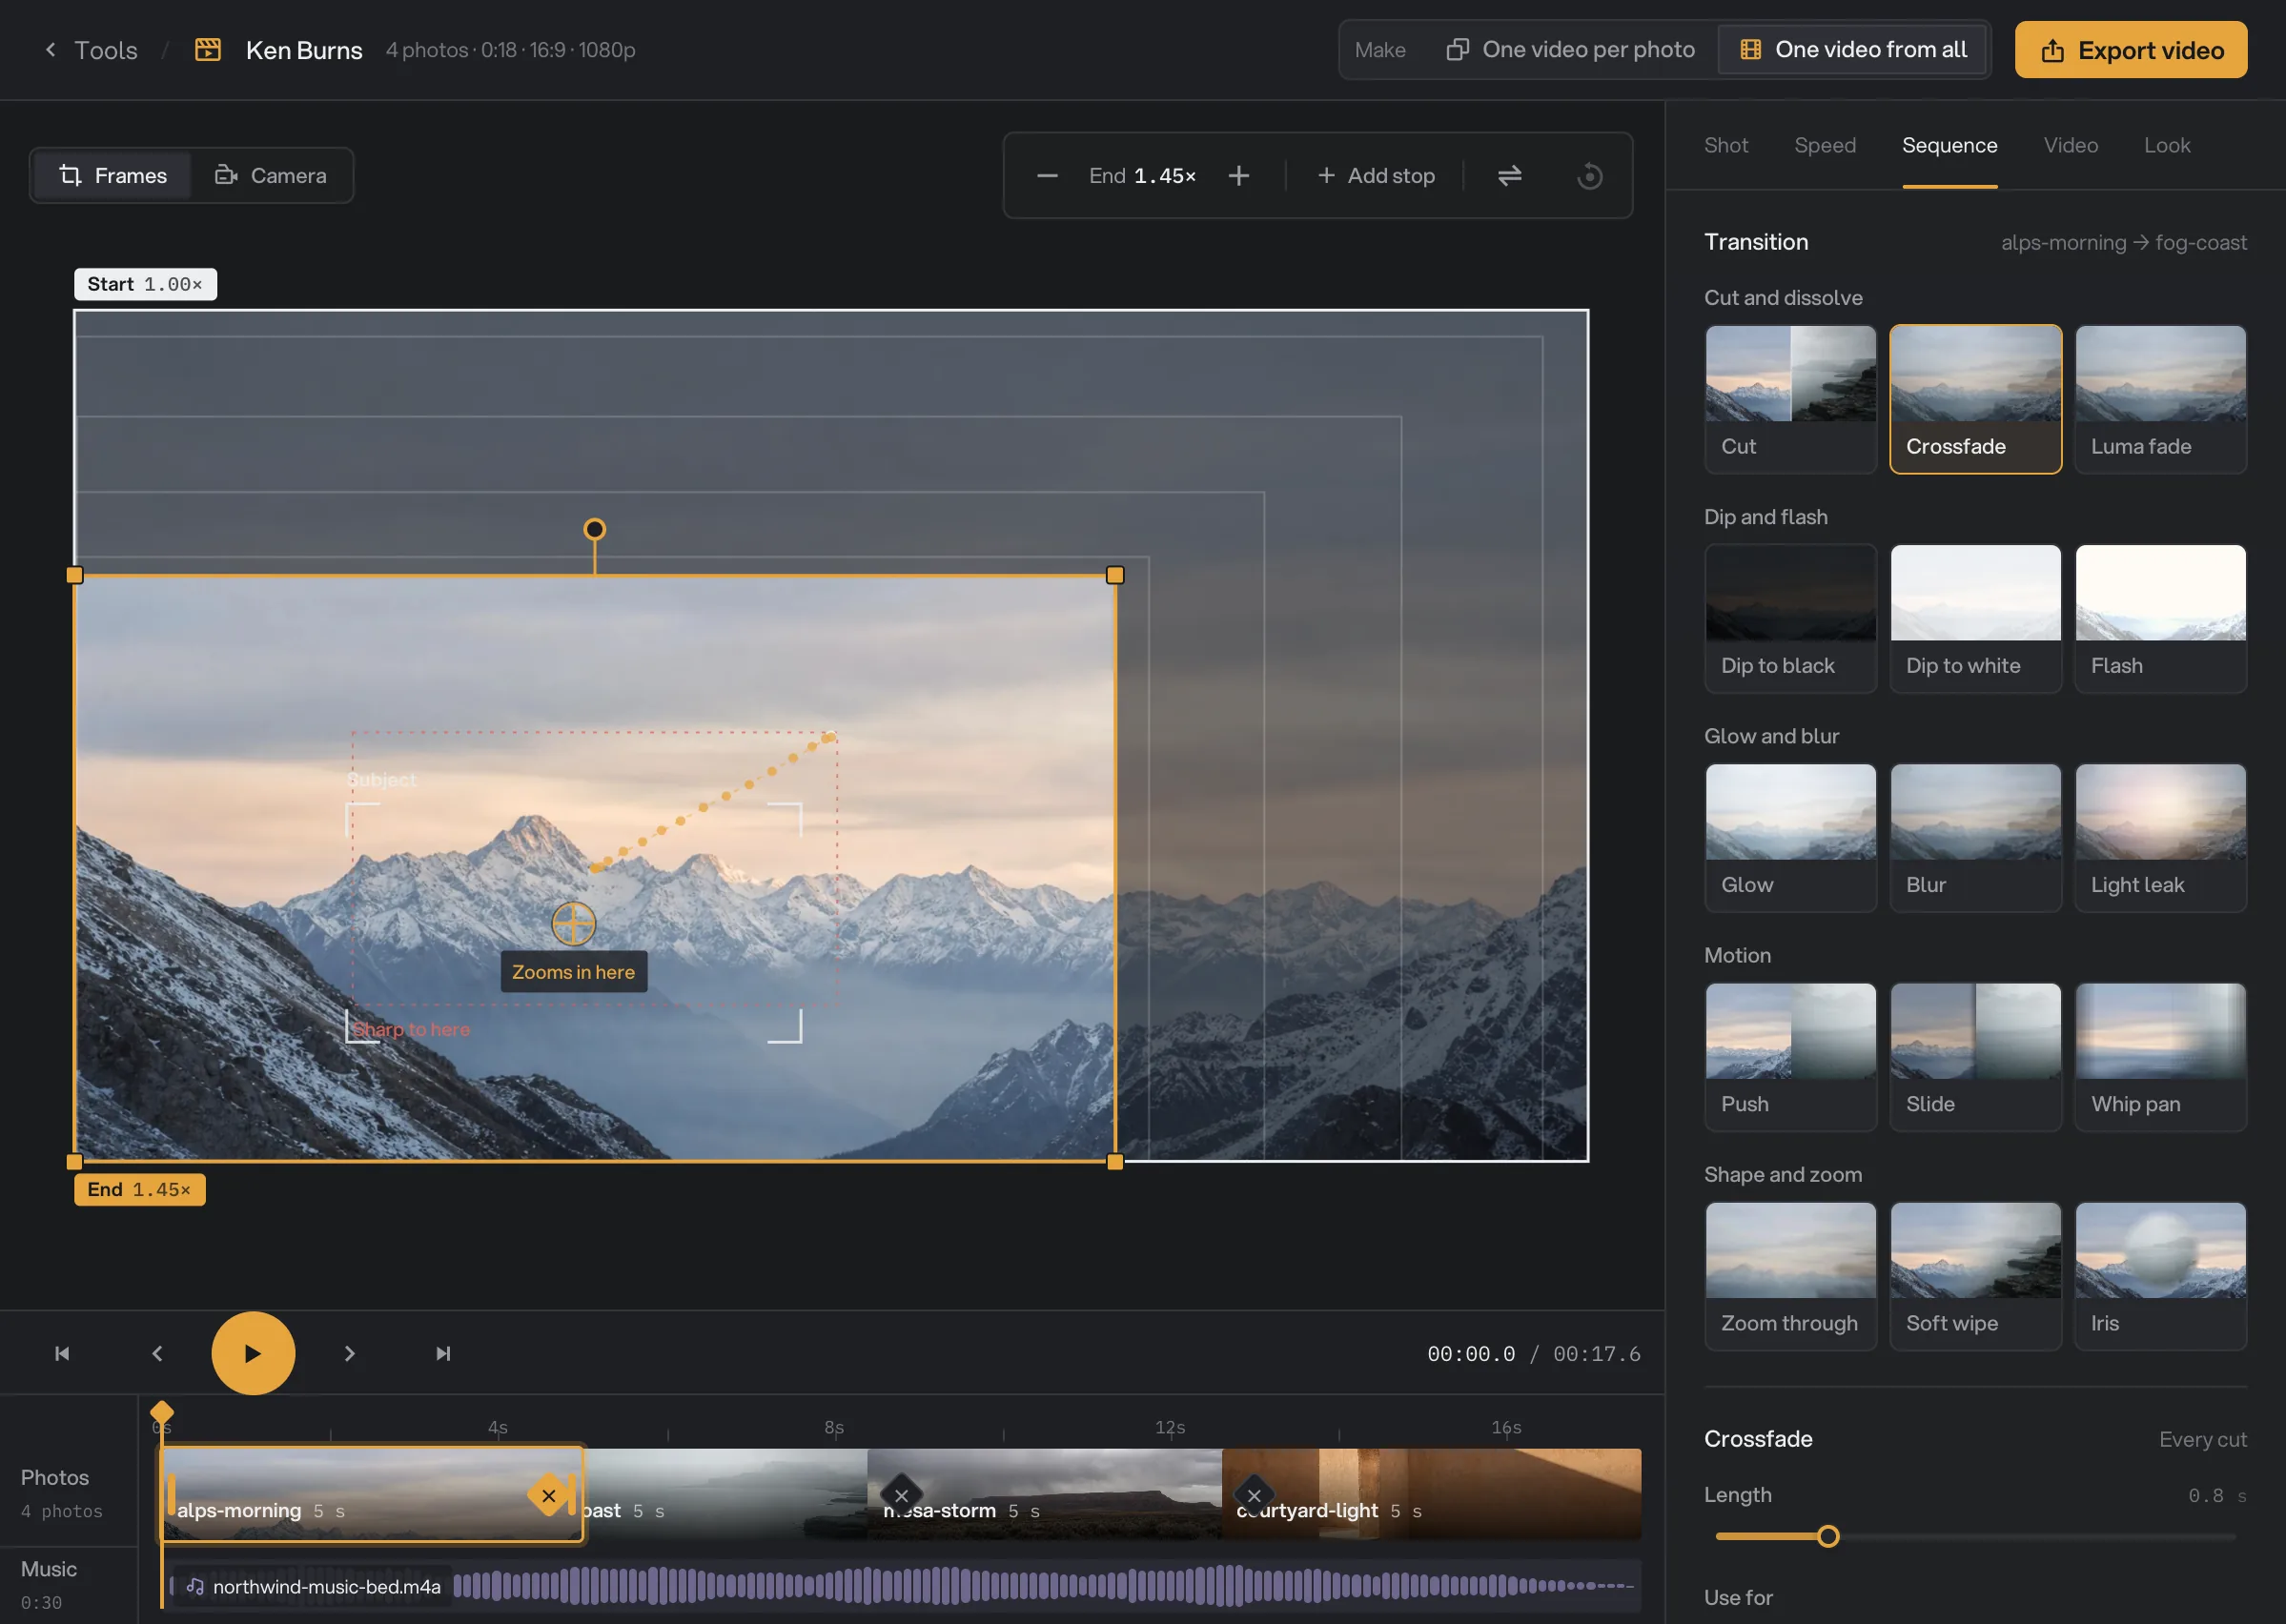
With One video from all, the timeline shows a ruler and your photos as clips, each as wide as it is long. Click a clip to select it, and drag it sideways to change the order. A diamond between two clips stands for the transition there; click it to edit that transition. The Sequence tab holds the rest:
- Transition: 15 transitions in five groups. Each one is a small preview made from your own two photos, and it plays when you point at it. Cut and dissolve: Cut, Crossfade (the default) and Luma fade, where the next photo comes through the dark parts first. Dip and flash: Dip to black, Dip to white and Flash. Glow and blur: Glow, Blur and Light leak. Motion: Push, Slide and Whip pan. Shape and zoom: Zoom through, Soft wipe and Iris, which opens on the next photo’s subject. Under the previews, the chosen transition has its Length, from 0.2 to 3 seconds (0.8 by default); a transition is never longer than half the shorter of its two photos. Push, Slide, Whip pan and Soft wipe also have Direction: Auto (the default) follows the way the camera was moving, or pick Left, Right, Up or Down. With three or more photos, Use for sets it for Every cut or This cut only, so two particular photos can meet in their own way.
- Photos: Same length for all is on by default, with an Each photo length of 5 seconds. Vary moves keeps the slideshow from repeating itself. Same gives every photo the move you picked. Alternate (the default) gives every other photo the opposite move, such as Push in, then Pull out. Shuffle mixes the moves and never repeats the same one twice in a row; click Shuffle again for a new mix. A photo you gave its own move keeps it.
- Music: click Add music to pick an MP3, WAV, M4A or FLAC song. It uses the same music library as Add audio. Use Replace to pick another song, or remove it. Set the Volume (80% by default), Start at to skip into the song, and Fade out from 0 to 8 seconds (3 by default). Fit the video to the song stretches every photo evenly so the video ends with the song.
The timeline’s music lane shows the song’s waveform, or an Add music button when there is no song yet. Start at appears for songs longer than 2 seconds.
- Transition
- A transition on the timeline
- A photo clip
- Music lane
With One video per photo, the timeline shows a strip of real frames from the move, a speed lane under it, hatched Hold areas and numbered stop markers. Click or drag on it to move the playhead. The transport buttons jump to the start, step back one frame, play, step forward one frame and jump to the end.
Step 7: Choose the video size, file and look
On the Video tab:
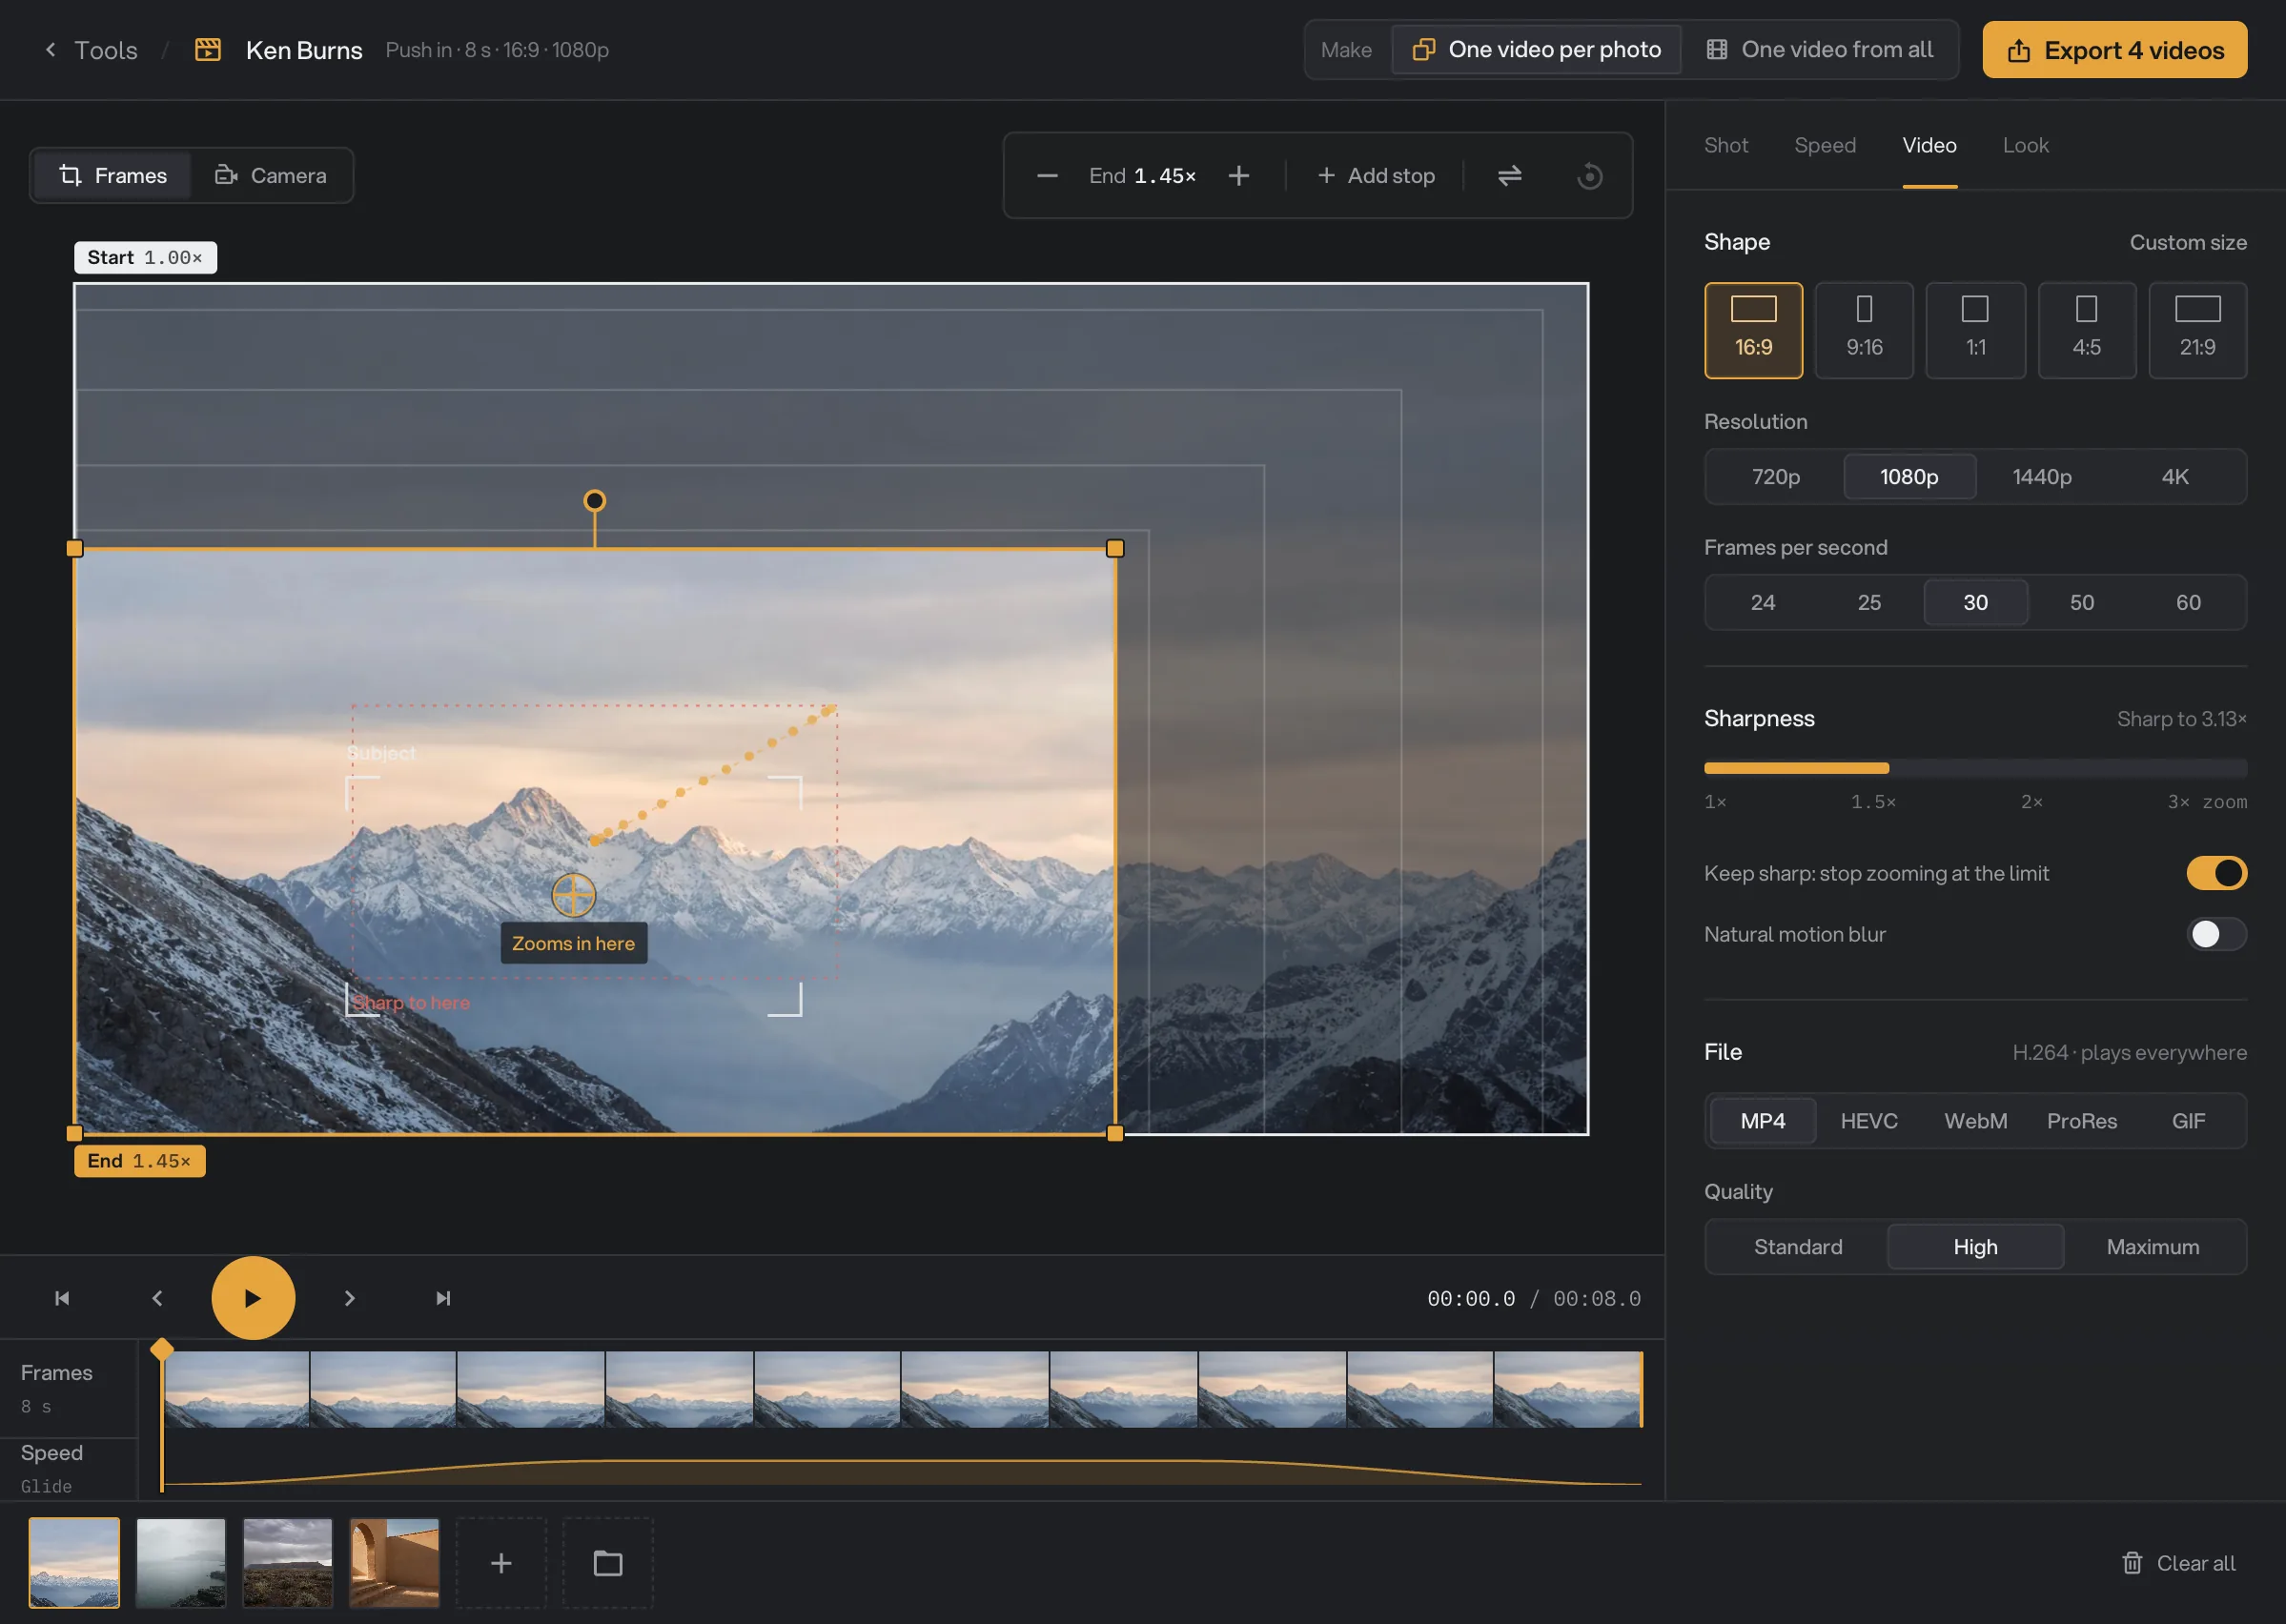
- Shape: 16:9 (the default), 9:16, 1:1, 4:5, 21:9 or Custom size, where you type a Width and Height from 16 to 7680 pixels.
- Resolution: 720p, 1080p (the default), 1440p or 4K. This is the short side of the video.
- Frames per second: 24, 25, 30 (the default), 50 or 60.
- Sharpness: a meter compares how far the move zooms with how far the photo can zoom before it goes soft, and a readout sums it up, such as Sharp to 3.1×, Stops at 1.6× to stay sharp or Soft past 1.6×. Keep sharp: stop zooming at the limit is on by default and caps the zoom, so a photo never looks soft. If a photo is too small for the video even before any zoom, the meter gives way to a short note, Too small · stretched 8× for example. It gives the photo’s size, how much it is stretched, and the narrowest photo that stays sharp. When a lower resolution would be sharp, it offers one, such as export at 1080p.
- Natural motion blur: off by default. Adds a soft, film-like blur on fast moves.
- File: MP4 (the default) is H.264 and plays everywhere. On a computer with no hardware H.264 encoder, MP4 is saved as AV1, which some older players can’t open. HEVC makes smaller files but needs a hardware video encoder. WebM is for the web. ProRes is for editing apps, saved as a
.movfile. GIF stops at 15 seconds, runs at up to 15 frames per second and is at most 720p unless you use Custom size. Quality is Standard, High (the default) or Maximum, for every file type except GIF. For ProRes it picks ProRes 422 LT, 422 or 422 HQ. A song you added is included in every file type except GIF.
- Shape
- Resolution
- Sharpness
- File
- Quality
On the Look tab, pick a Grade: None (the default), Warm, Cool, Faded, Mono or Rich. Under Texture, set Film grain (25% by default), its Grain size (Fine or Coarse) and the Vignette (15% by default). Under Fades and bars, choose Fade in and Fade out (None, Black or White), the Fade length from 0 to 3 seconds (1 by default), and Cinema bars (Off, 2.39:1 or 1.85:1). Grain size shows only while Film grain is above 0, and Fade length only while a fade is on.
- Camera view
- Grade
- Texture
- Fades and bars
Step 8: Export, then check the result
Play the move in the Camera view, and with several photos, click a few of them to check each one. Then click the export button at the top right. It reads Export video for one video, or shows how many, such as Export 4 videos. While it works, it shows how far it got, such as Exporting 2/4….
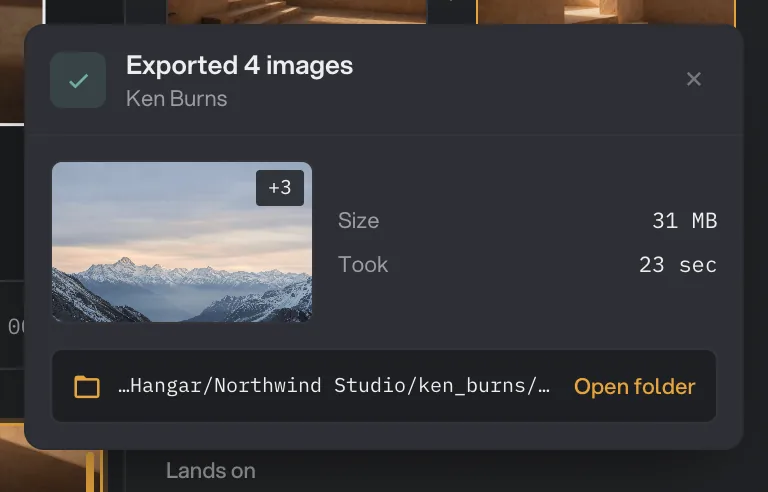
When the export ends, a card in the corner shows a thumbnail, the total Size and how long it Took. Its title counts the photos you used, such as "Exported 4 images", even when they made one video. Click Open folder to see the files. They are saved in your workspace’s output folder, in a ken_burns folder with a subfolder for today’s date, such as 11-04. See Where your files are saved.
- What was exported
- Open folder
Every setting, and when to change it
Some settings only appear when they apply, such as Path when there are stops, or the Sequence tab in One video from all.
- Make
One video for each photo, or every photo joined into one video in queue order.
- RangeOne video per photo, One video from all
- DefaultOne video per photo (One video from all once you add two or more photos)
- Move
The camera move. Custom is your own frames.
- Range12 moves, from Push in to Custom
- DefaultPush in
- Zoom
How much the move zooms from start to end. Push in and Pull out are its two sides.
- RangeOut 2× to In 2×
- DefaultDepends on the move (In 1.45× for Push in)
- Travel / Turn
How far the camera travels (Drift, Rise, Descend, Diagonal) or turns (Roll).
- Range0 to 100 (Subtle, Gentle, Strong, Bold)
- Default40
- Frames
Zoom (1× to 4×), Turn (up to 10° either way) and Position (X and Y as a percent of the photo) for each frame.
- RangeStart, up to 4 stops, End
- Path
With stops, whether the camera goes from frame to frame in straight lines or glides through the stops.
- RangeStraight, Curved
- DefaultStraight
- Lands on
Where the move goes. Subject finds the main subject of the photo, or goes to the center if nothing stands out. Your spot is where you aim the cross on the photo.
- RangeSubject, Centre, Your spot
- DefaultSubject
- Photo shape
For a photo whose shape differs from the video: crop it to fill the frame, or show it whole on a blurred copy of itself or on a color you pick (black by default).
- RangeFill, Blurred, Colour
- DefaultFill
- Speed curve
How the camera speeds up and slows down. Custom sets Ease in and Ease out by hand.
- RangeGlide, Ease, Steady, Custom
- DefaultGlide
- Length
How long the shot lasts. In One video from all with Same length for all on, the Each photo length is used instead.
- Range1 to 60 s
- Default8 s
- Hold at start / Hold at end
Keeps the camera still before or after the move.
- Range0 to 5 s
- Default0 s
- Play backwards
Runs the move from end to start.
- DefaultOff
- Loop back to the start
Goes out and comes back, so the shot ends where it began.
- DefaultOff
- Transition
How one photo hands over to the next in One video from all. Use for sets it for Every cut or This cut only.
- Range15, from Cut to Iris
- DefaultCrossfade
- Direction
Which way Push, Slide, Whip pan and Soft wipe travel. Auto follows the camera.
- RangeAuto, Left, Right, Up, Down
- DefaultAuto
- Transition length
How long each transition lasts, never more than half the shorter of its two photos.
- Range0.2 to 3 s
- Default0.8 s
- Same length for all / Each photo
Gives every photo in the slideshow the same length.
- DefaultOn, 5 s
- Vary moves
Same repeats your move, Alternate flips every other photo to the opposite move, Shuffle mixes the moves without repeating one twice in a row.
- RangeSame, Alternate, Shuffle
- DefaultAlternate
- Music
A song under the slideshow, from the same music library as Add audio.
- RangeMP3, WAV, M4A, FLAC
- Volume
How loud the song plays.
- Range0% to 100%
- Default80%
- Start at
Skips into the song, so the video starts at the part you want.
- Fade out
Fades the song out at the end of the video.
- Range0 to 8 s
- Default3 s
- Fit the video to the song
Stretches every photo evenly so the video ends with the song.
- DefaultOff
- Shape
The shape of the video. Custom size takes a width and height from 16 to 7680 pixels.
- Range16:9, 9:16, 1:1, 4:5, 21:9, Custom size
- Default16:9
- Resolution
The short side of the video.
- Range720p, 1080p, 1440p, 4K
- Default1080p
- Frames per second
How smooth the motion looks. GIF runs at up to 15.
- Range24, 25, 30, 50, 60
- Default30
- Keep sharp: stop zooming at the limit
Stops the zoom before a photo goes soft.
- DefaultOn
- Natural motion blur
A soft, film-like blur on fast moves.
- DefaultOff
- File
The file type. ProRes saves as .mov. GIF stops at 15 seconds and is at most 720p unless you use Custom size.
- RangeMP4, HEVC, WebM, ProRes, GIF
- DefaultMP4
- Quality
How much detail the video keeps, against its file size. For ProRes: 422 LT, 422 or 422 HQ. Not for GIF.
- RangeStandard, High, Maximum
- DefaultHigh
- Grade
A color look for the whole video.
- RangeNone, Warm, Cool, Faded, Mono, Rich
- DefaultNone
- Film grain
A light film grain. Grain size is Fine or Coarse.
- Range0% to 100%
- Default25%
- Vignette
Darkens the edges of the frame.
- Range0% to 100%
- Default15%
- Fade in / Fade out
Fades the video in from, or out to, black or white. Fade length runs from 0 to 3 s, 1 s by default.
- RangeNone, Black, White
- DefaultNone
- Cinema bars
Black bars at the top and bottom for a film look.
- RangeOff, 2.39:1, 1.85:1
- DefaultOff
How to get the best results
- Start with a move and its Zoom. Pick the move that suits the photo, then set Zoom and Travel. Drag the cross to aim it. Drag the frames or switch to Custom only when the move still does not land right.
- Use Focus for portraits and products. With Lands on set to Subject, Focus closes in on the face or the product Hangar finds.
- Use Blurred for tall photos in a wide video. A portrait photo in a 16:9 video loses most of itself with Fill. Blurred shows all of it, on a soft copy of itself.
- Fit the video to the song for music slideshows. Turn on Fit the video to the song and the last photo ends with the music.
- Pick the shape for where you post. Use 9:16 for Reels, TikTok and Shorts, 1:1 or 4:5 for feeds, and 16:9 for YouTube and presentations.
- Keep Keep sharp on with small photos. It stops the zoom before a small photo turns soft. For the strongest moves, use large photos.
Why a result disappoints
- The photo looks soft or blurry. The photo is smaller than the video, or the move zooms past its limit. Turn on Keep sharp, lower the Zoom or the Resolution, or use a larger photo. Sharpness on the Video tab shows the limit.
- The move barely shows. Raise the Zoom or Travel, or shorten the Length so the camera moves faster.
- The move lands in the wrong place. Subject goes to the center when nothing stands out in the photo. Drag the cross, or click inside a frame, where you want the move to go; Lands on switches to Your spot.
- Part of the photo is cut off. Photo shape is set to Fill, which crops photos whose shape differs from the video. Choose Blurred or Colour to show the whole photo.
- The video ends before the song, or the song cuts off. Turn on Fit the video to the song, or set a Fade out so the song ends gently.
- The export failed with "HEVC needs a hardware video encoder, and this computer has none." Choose MP4 instead.
- The MP4 won’t play in an older app. On a computer without a hardware H.264 encoder, MP4 is saved as AV1. Play it in a recent player, or choose WebM.
- The GIF is short or small. A GIF stops at 15 seconds, runs at up to 15 frames per second, is at most 720p unless you use Custom size, and has no sound. Choose MP4 for longer or sharper videos.
- A photo failed with "Couldn’t read this photo". HEIC photos are not supported yet. Convert them to JPG with Convert images, and add them again.
For other errors, see A file failed: what to check.
Limits
- Ken Burns takes JPG, PNG, WebP, TIFF and BMP photos. HEIC photos fail at export, and camera RAW files don’t show in the Studio. An animated WebP or GIF is used as a single still frame, its first.
- A move has at most 6 frames: Start, up to 4 stops and End. A frame turns at most 10° either way.
- A shot lasts 1 to 60 seconds. A transition lasts 0.2 to 3 seconds, and never more than half the shorter of its two photos.
- A GIF stops at 15 seconds, runs at up to 15 frames per second and has no sound. It is at most 720p unless you use Custom size.
- HEVC needs a hardware video encoder.
- Files are saved in your workspace’s output folder. Ken Burns has no option to pick another folder for one export.
- Everything runs on your computer. Nothing is uploaded.
Common questions
Can I make one slideshow from many photos?
Yes. Set Make to One video from all at the top of the Studio. The photos join in queue order, with a transition between each pair. Drag a clip on the timeline to change the order, and add a song on the Sequence tab.
Will my photos look blurry when the camera zooms in?
Not with Keep sharp on, which is the default. The Video tab shows how far each photo can zoom before it goes soft, and Keep sharp stops the move at that limit. A photo smaller than the video is always enlarged, so use a bigger photo or a lower resolution for those.
Can I give one photo a different move?
Yes. In One video per photo, select the photo, then click Only this photo in the line at the bottom of the Shot or Speed tab. Your changes then apply to that photo only. Click All photos to change every photo again, or Reset to drop the photo’s own settings. In One video from all, changes on the Shot and Speed tabs already apply to the photo you selected on the timeline.
Can I use HEIC or camera RAW photos?
Not yet. Ken Burns takes JPG, PNG, WebP, TIFF and BMP photos. A HEIC photo shows in the Studio but fails at export, and camera RAW files don’t show in the Studio at all. Convert them to JPG first with Convert images, then add the JPGs.
Does the preview match the exported video?
Very closely. The Camera view shows exactly what the video frames, with the same move, speed and look. The export adds real film grain and, when it is on, motion blur, so those look a little different from the preview.
Still stuck?
One person reads every message, usually with a reply within a day.