 Agencies and studios
 Photographers
 Podcasters
 Video and social creators
 Marketers and content teams
What does Enhance voice do?
Enhance voice cleans up spoken recordings on your own computer. It removes background noise such as room sound, traffic, fans and hum, cuts down echo, evens out loud and quiet voices, and sets the finished loudness. In the app the tool is called Enhance Voice.
It takes audio files and video files. Each file you add gives back one new file, with "-enhanced" added to its name. A video keeps its picture exactly as it was and gets the cleaned sound. Before you run it, you can listen to the difference on any part of a file.
Step 1: Add your recordings
Click Tools in the sidebar, open the Audio tab and click Enhance Voice in the Edit section. It also appears on the Video tab, under Also works with video. You can also type "remove background noise" in the search box at the top.
Enhance Voice opens as a Studio. Click Drop a recording to pick files, or drag audio or video files onto the window. Each file gets a tile in the strip at the bottom: audio files show a small waveform, and videos show a frame. Click a tile to bring that file onto the stage. Use the + tile to add more files, point at a tile and click its × to take it out, or click Clear all to start again.
The top bar shows a rough time for the run, such as "≈ 18 min", next to the Enhance 3 files button, which counts your files. Enhance works at about five times the speed of playback, so an hour of recording takes around 12 minutes. On a narrow window the estimate is hidden.
Step 2: Listen before you run
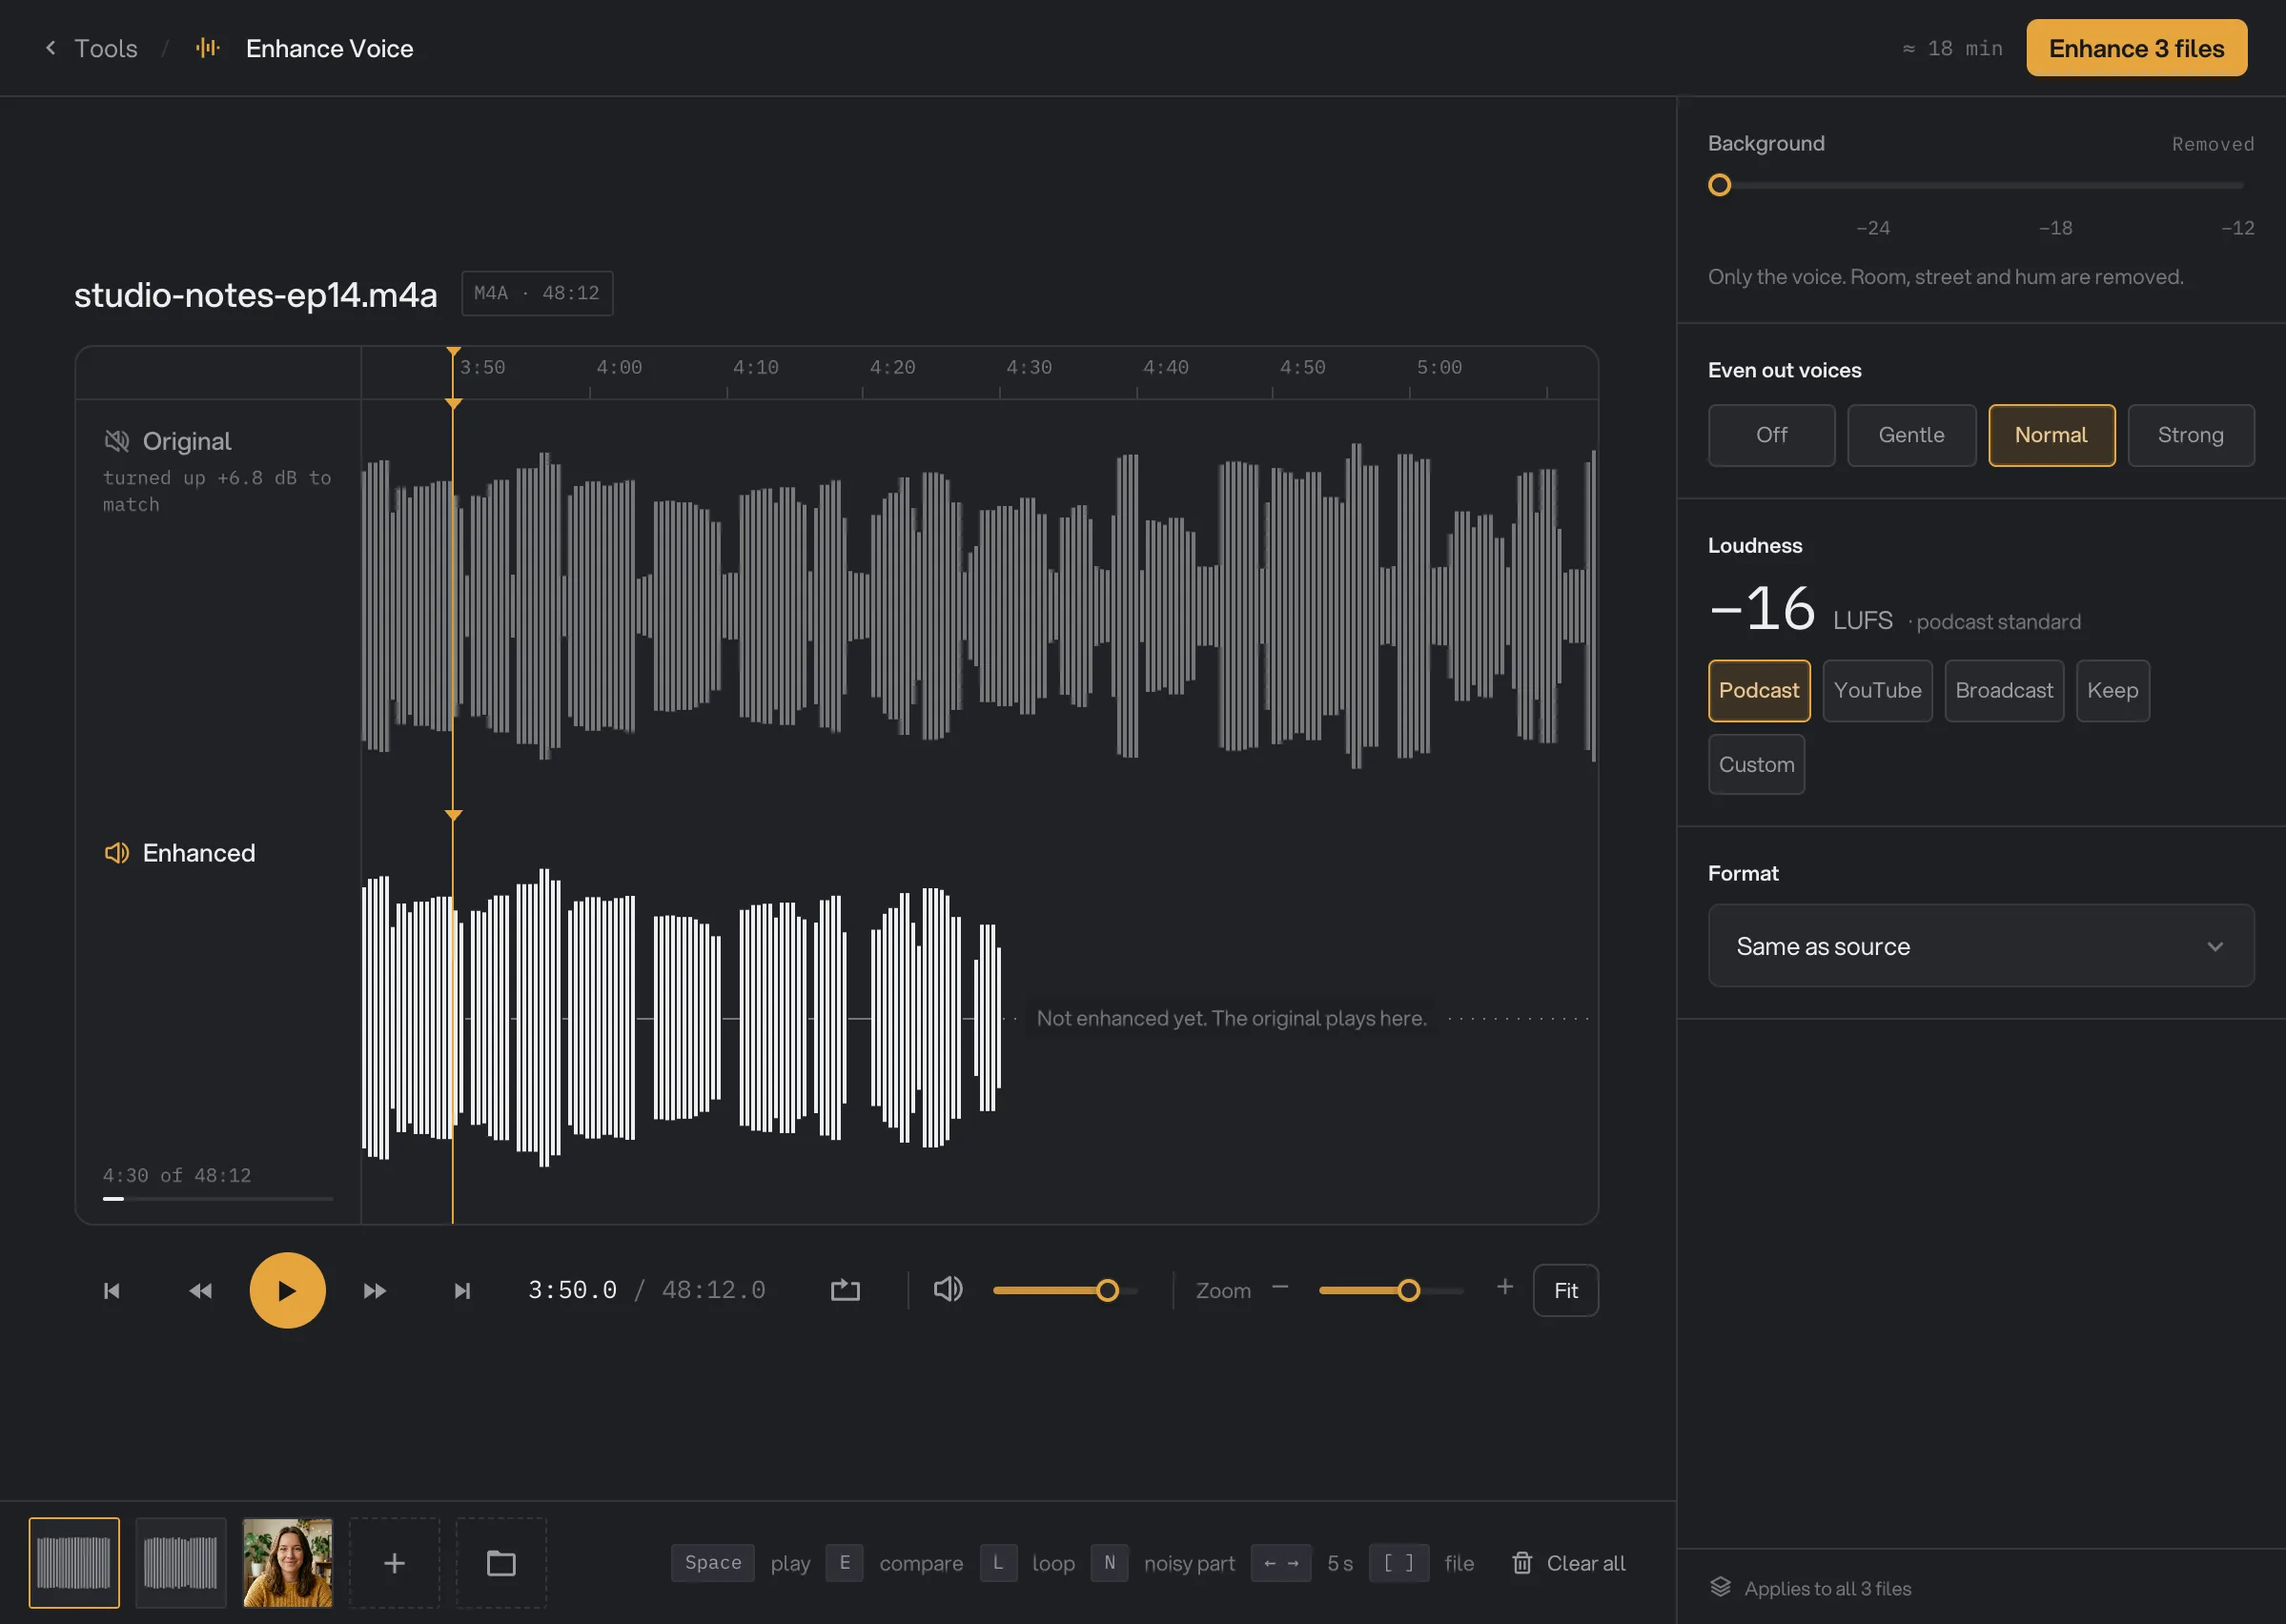
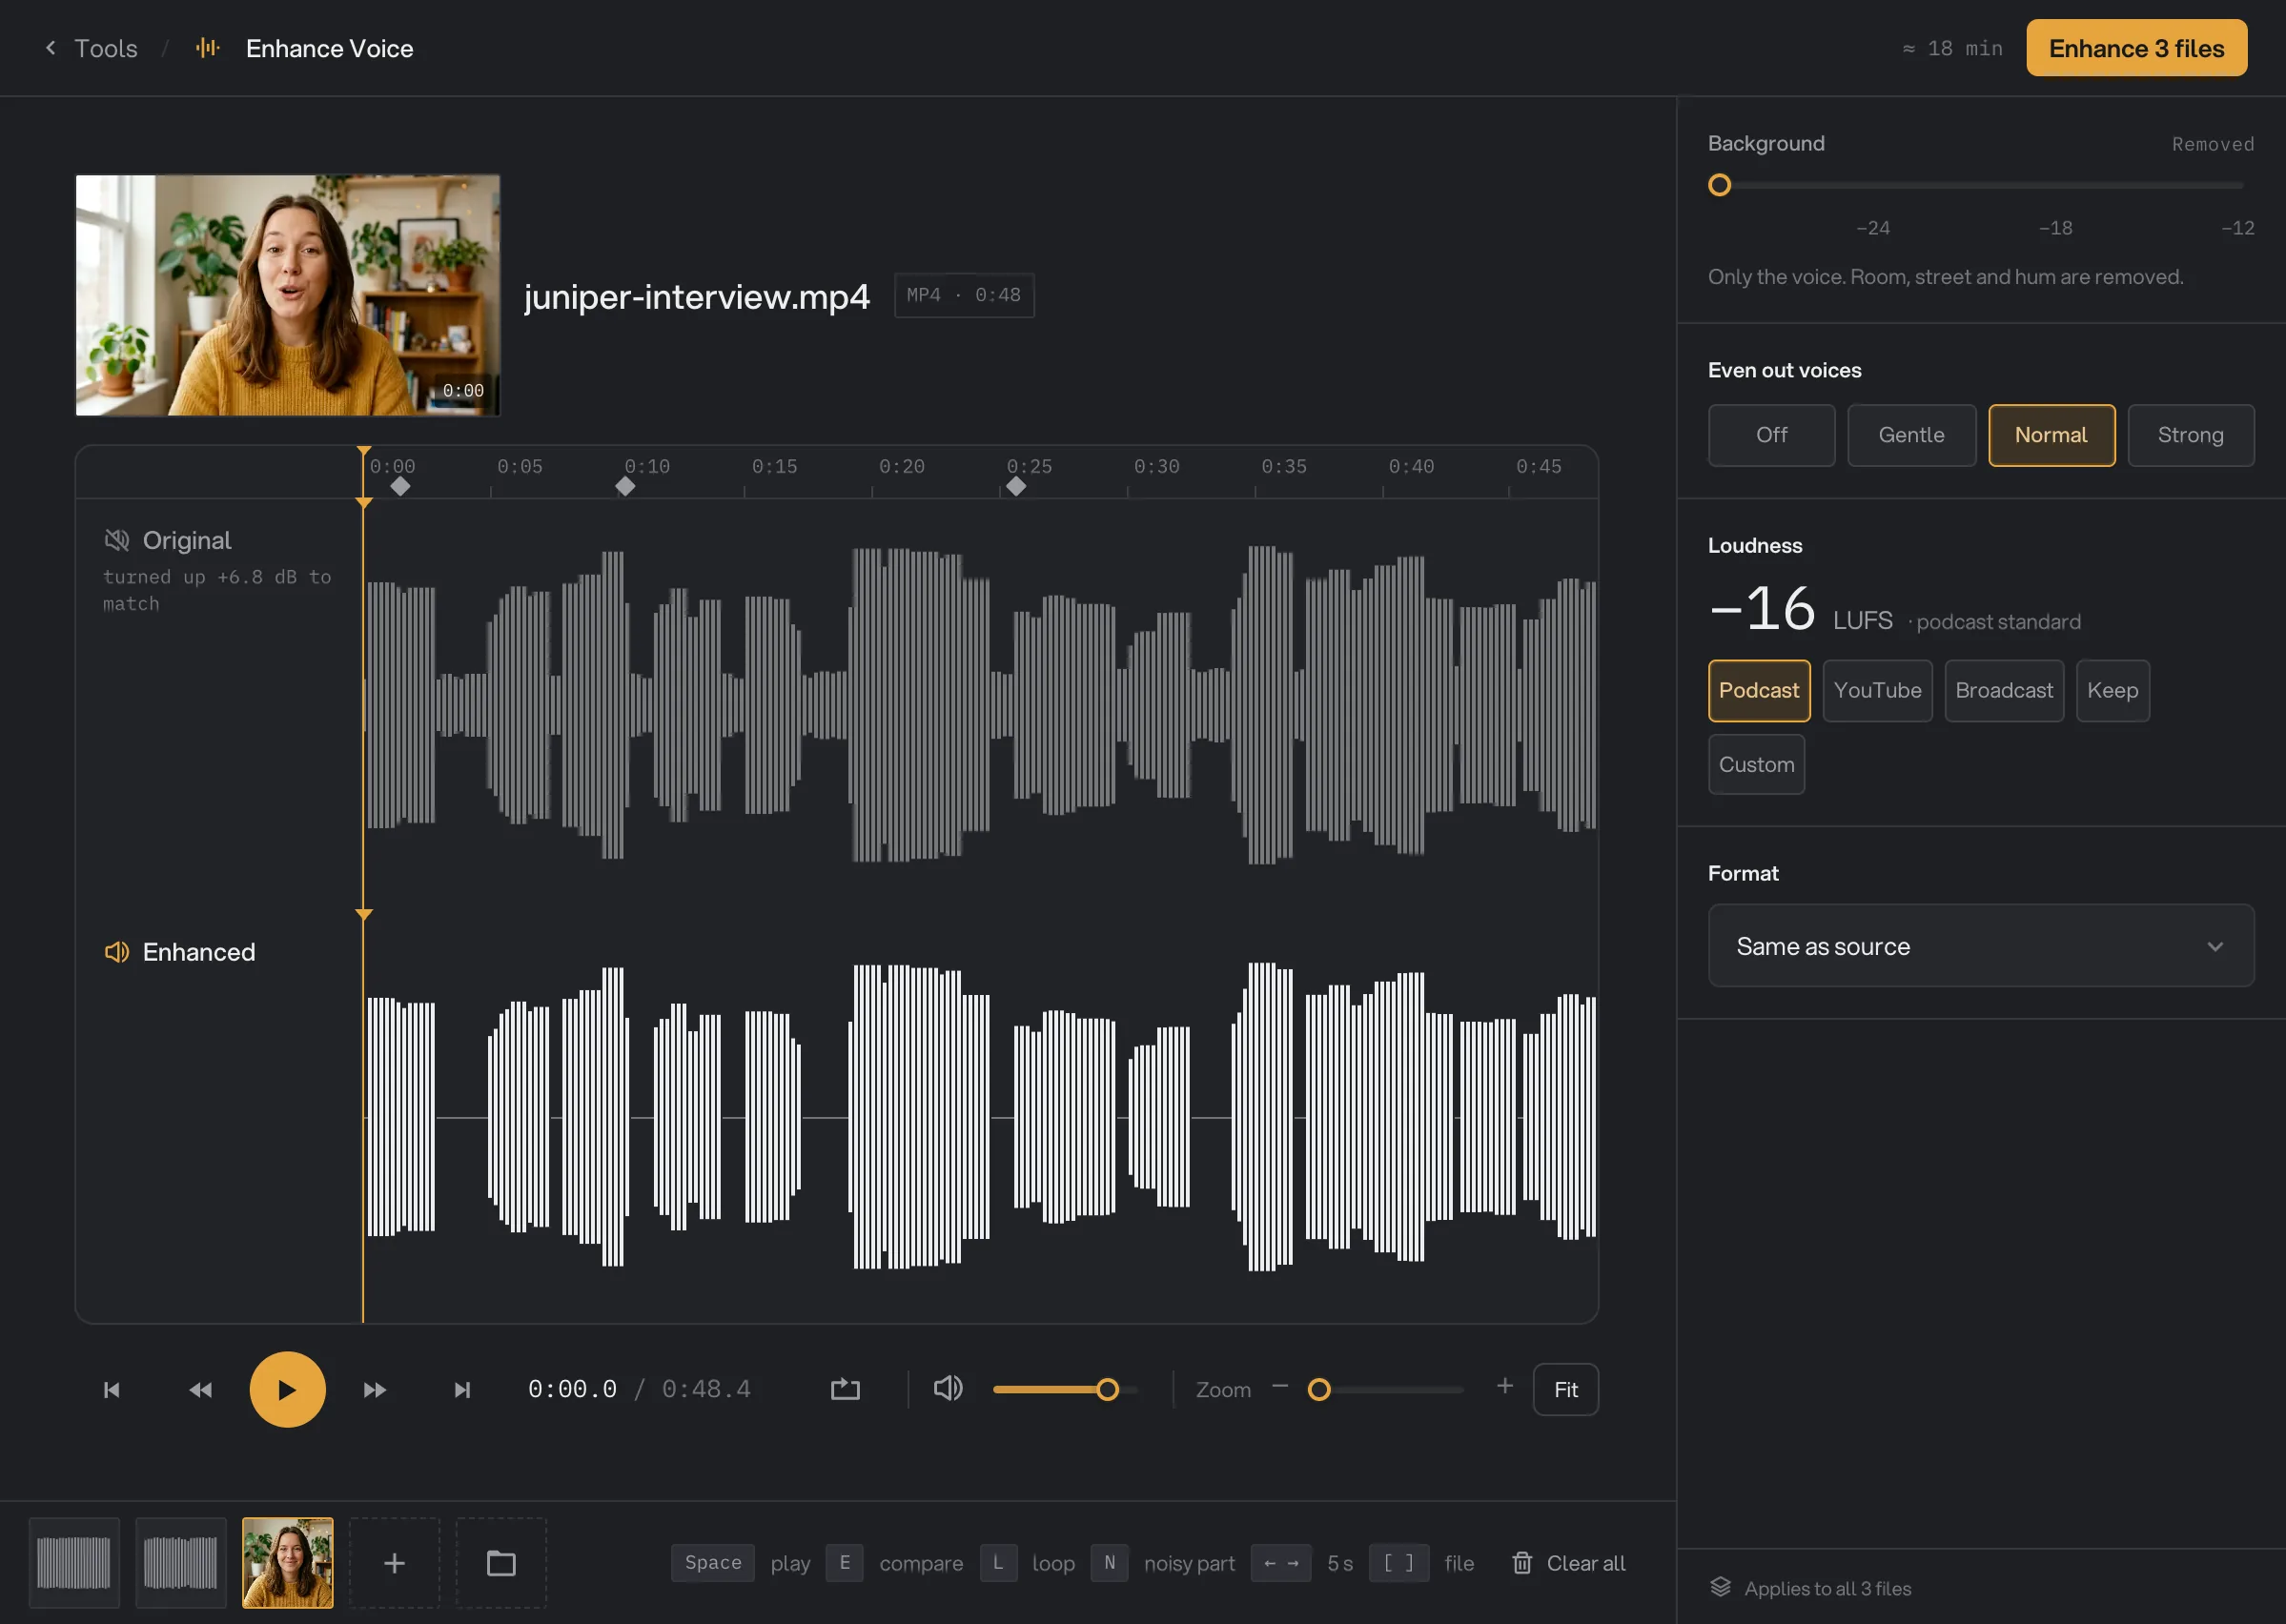
The stage shows the file’s name, its format and its length. Under it is the deck: two lanes on one timeline, Original on top and Enhanced under it. Each lane shows the whole file, and you can play any part of it, from start to end. A video also shows its picture above the deck, in time with the sound.
Hangar starts enhancing as soon as the file is on the stage, from where you are listening, and works through the rest of the file in the background. A thin bar under the Enhanced label shows how much is ready, such as "4:30 of 48:12". Where a part is not ready yet, the Enhanced lane says "Not enhanced yet. The original plays here." and the original plays there instead.
- Your files
- Original lane
- Enhanced lane
- How much is ready
- Play
- Settings
- Run
- Press Space, or click the play button, to play or pause.
- Press E, or click a lane’s name, to switch between Original and Enhanced. The switch is instant and keeps your place. Both play at the same loudness, so you hear only what the cleanup changes. The Original lane says how far it was turned to match, such as "turned up +13.4 dB to match".
- Click anywhere on the deck to jump there, or drag to scrub. Press ← and →, or the arrow buttons, to skip 5 seconds. The time shows where you are and the file’s length, such as "12:31.4 / 48:12.0".
- Press L to loop 10 seconds from where you are, or to bring back the loop box you made before. Hold Shift and drag on the deck to loop a part you choose. The loop shows as a box on the deck: drag the box to move it, or drag its left or right edge to make it shorter or longer. Press L again to stop looping.
- Press N to jump to the next noisy part. Small diamonds on the timeline mark the stretches with the most background noise, where the difference is easiest to hear.
- Set how loud you listen with the volume fader, or click the speaker to mute. This only changes what you hear, never the file, and Hangar remembers it.
- On a long file, use Zoom to see a few seconds up close, or click Fit to see the whole file again. You can also hold ⌘ (Ctrl on Windows) and scroll on the deck.
- Press [ and ], or the outer arrow buttons, to go to the previous or next file.
On a wide window, a line beside the file strip lists these keys, so you don’t need to remember them.
Change a setting while it plays, and Hangar starts again on the new settings from the same place, so you can compare two settings by ear. Playback can pause for a moment with "Loading…" while it gets that part ready. Changing only Loudness is quick, because the cleaned voice is kept and only turned up or down. Going back to a Background or Even out setting you already heard picks up what was ready. Hangar deletes these preview files when the run is done.
If a recording has very little noise to remove, a line under the play controls says: "This recording is already clean. Enhance will mostly set its loudness."
A video shows its picture above the deck, in time with what you hear. The picture has no sound of its own: you hear the lane you picked.
- The video’s picture
- The video’s tile
Step 3: Adjust the settings
The panel on the right holds one set of settings for every file in the Studio. The line at the bottom of the panel says so: "Applies to all 3 files". Each setting has a default, so you can also click Enhance straight away.
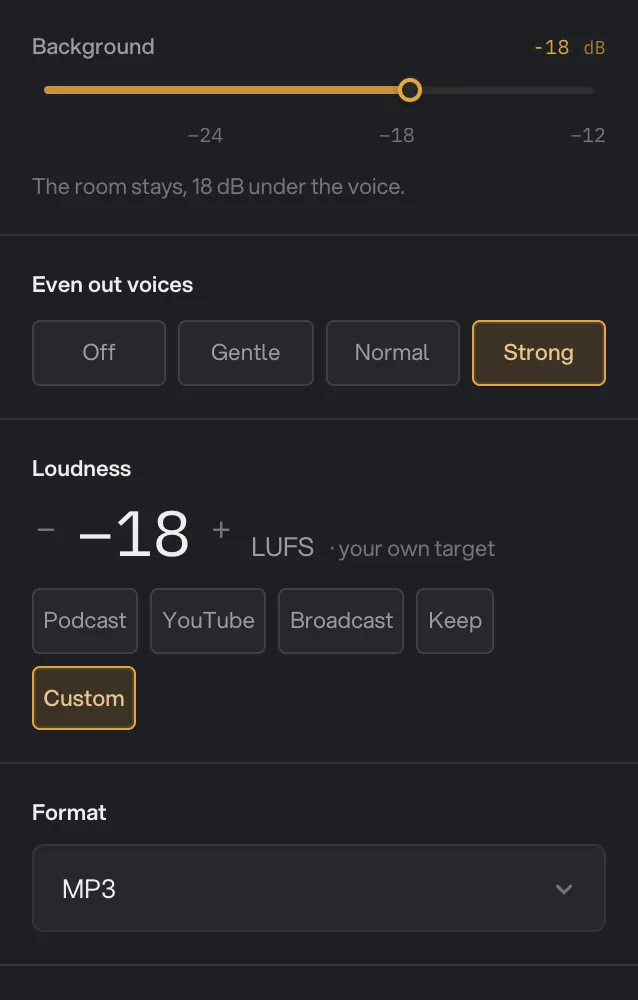
- Background decides what happens to everything that is not the voice. At its left end it reads Removed: "Only the voice. Room, street and hum are removed." The pauses between words become quiet. Move the fader to the right to keep some of the room under the voice, from -29 to -12 dB under it. The line under the fader then says how far, for example "The room stays, 24 dB under the voice." dB (decibels) is a step of volume: the bigger the number under the voice, the quieter the room.
- Even out voices brings loud and quiet phrases closer together, so a soft guest and a loud host, or a speaker who turns away from the microphone, are easier to follow. Choose Off, Gentle, Normal or Strong.
- Loudness sets how loud each finished file sounds, in LUFS. LUFS is a unit for how loud a whole recording sounds; the numbers are negative, and closer to zero is louder. Choose Podcast (-16 LUFS, the podcast standard), YouTube (-14 LUFS, for YouTube and social), Broadcast (-23 LUFS, the EBU R128 level for radio and TV), Keep (the recording’s own loudness) or Custom. With Custom, click − and + beside the number to pick your own target, from -30 to -10 LUFS. For example, -19 LUFS suits a mono podcast for Apple Podcasts. Podcast is chosen until you pick another. For a video for YouTube or social, choose YouTube. Hangar also keeps the loudest moments just under the maximum, so they do not distort.
- Format picks the kind of file you get for audio: Same as source, MP3, M4A, WAV or FLAC. When every file is a video, the panel has no Format, because a video keeps its own format. See What format do the new files use?
- Background
- Even out voices
- Custom loudness
- Format
Step 4: Run, then check the result
Click Enhance 3 files (the button counts your files). While it works, the button shows how far it got, such as "Enhancing 2 of 3 · 47%", and the settings are locked so they can’t change halfway through. The run also appears in Runs.
The new files go to your workspace’s output folder, in an enhance folder with a subfolder for today’s date, such as 11-02. Each one keeps its name with -enhanced added, such as interview-ep12-enhanced.wav. To save them somewhere else, change the workspace’s default output folder first: press ⌘B (Ctrl+B on Windows) and open Default output. See Where your files are saved.
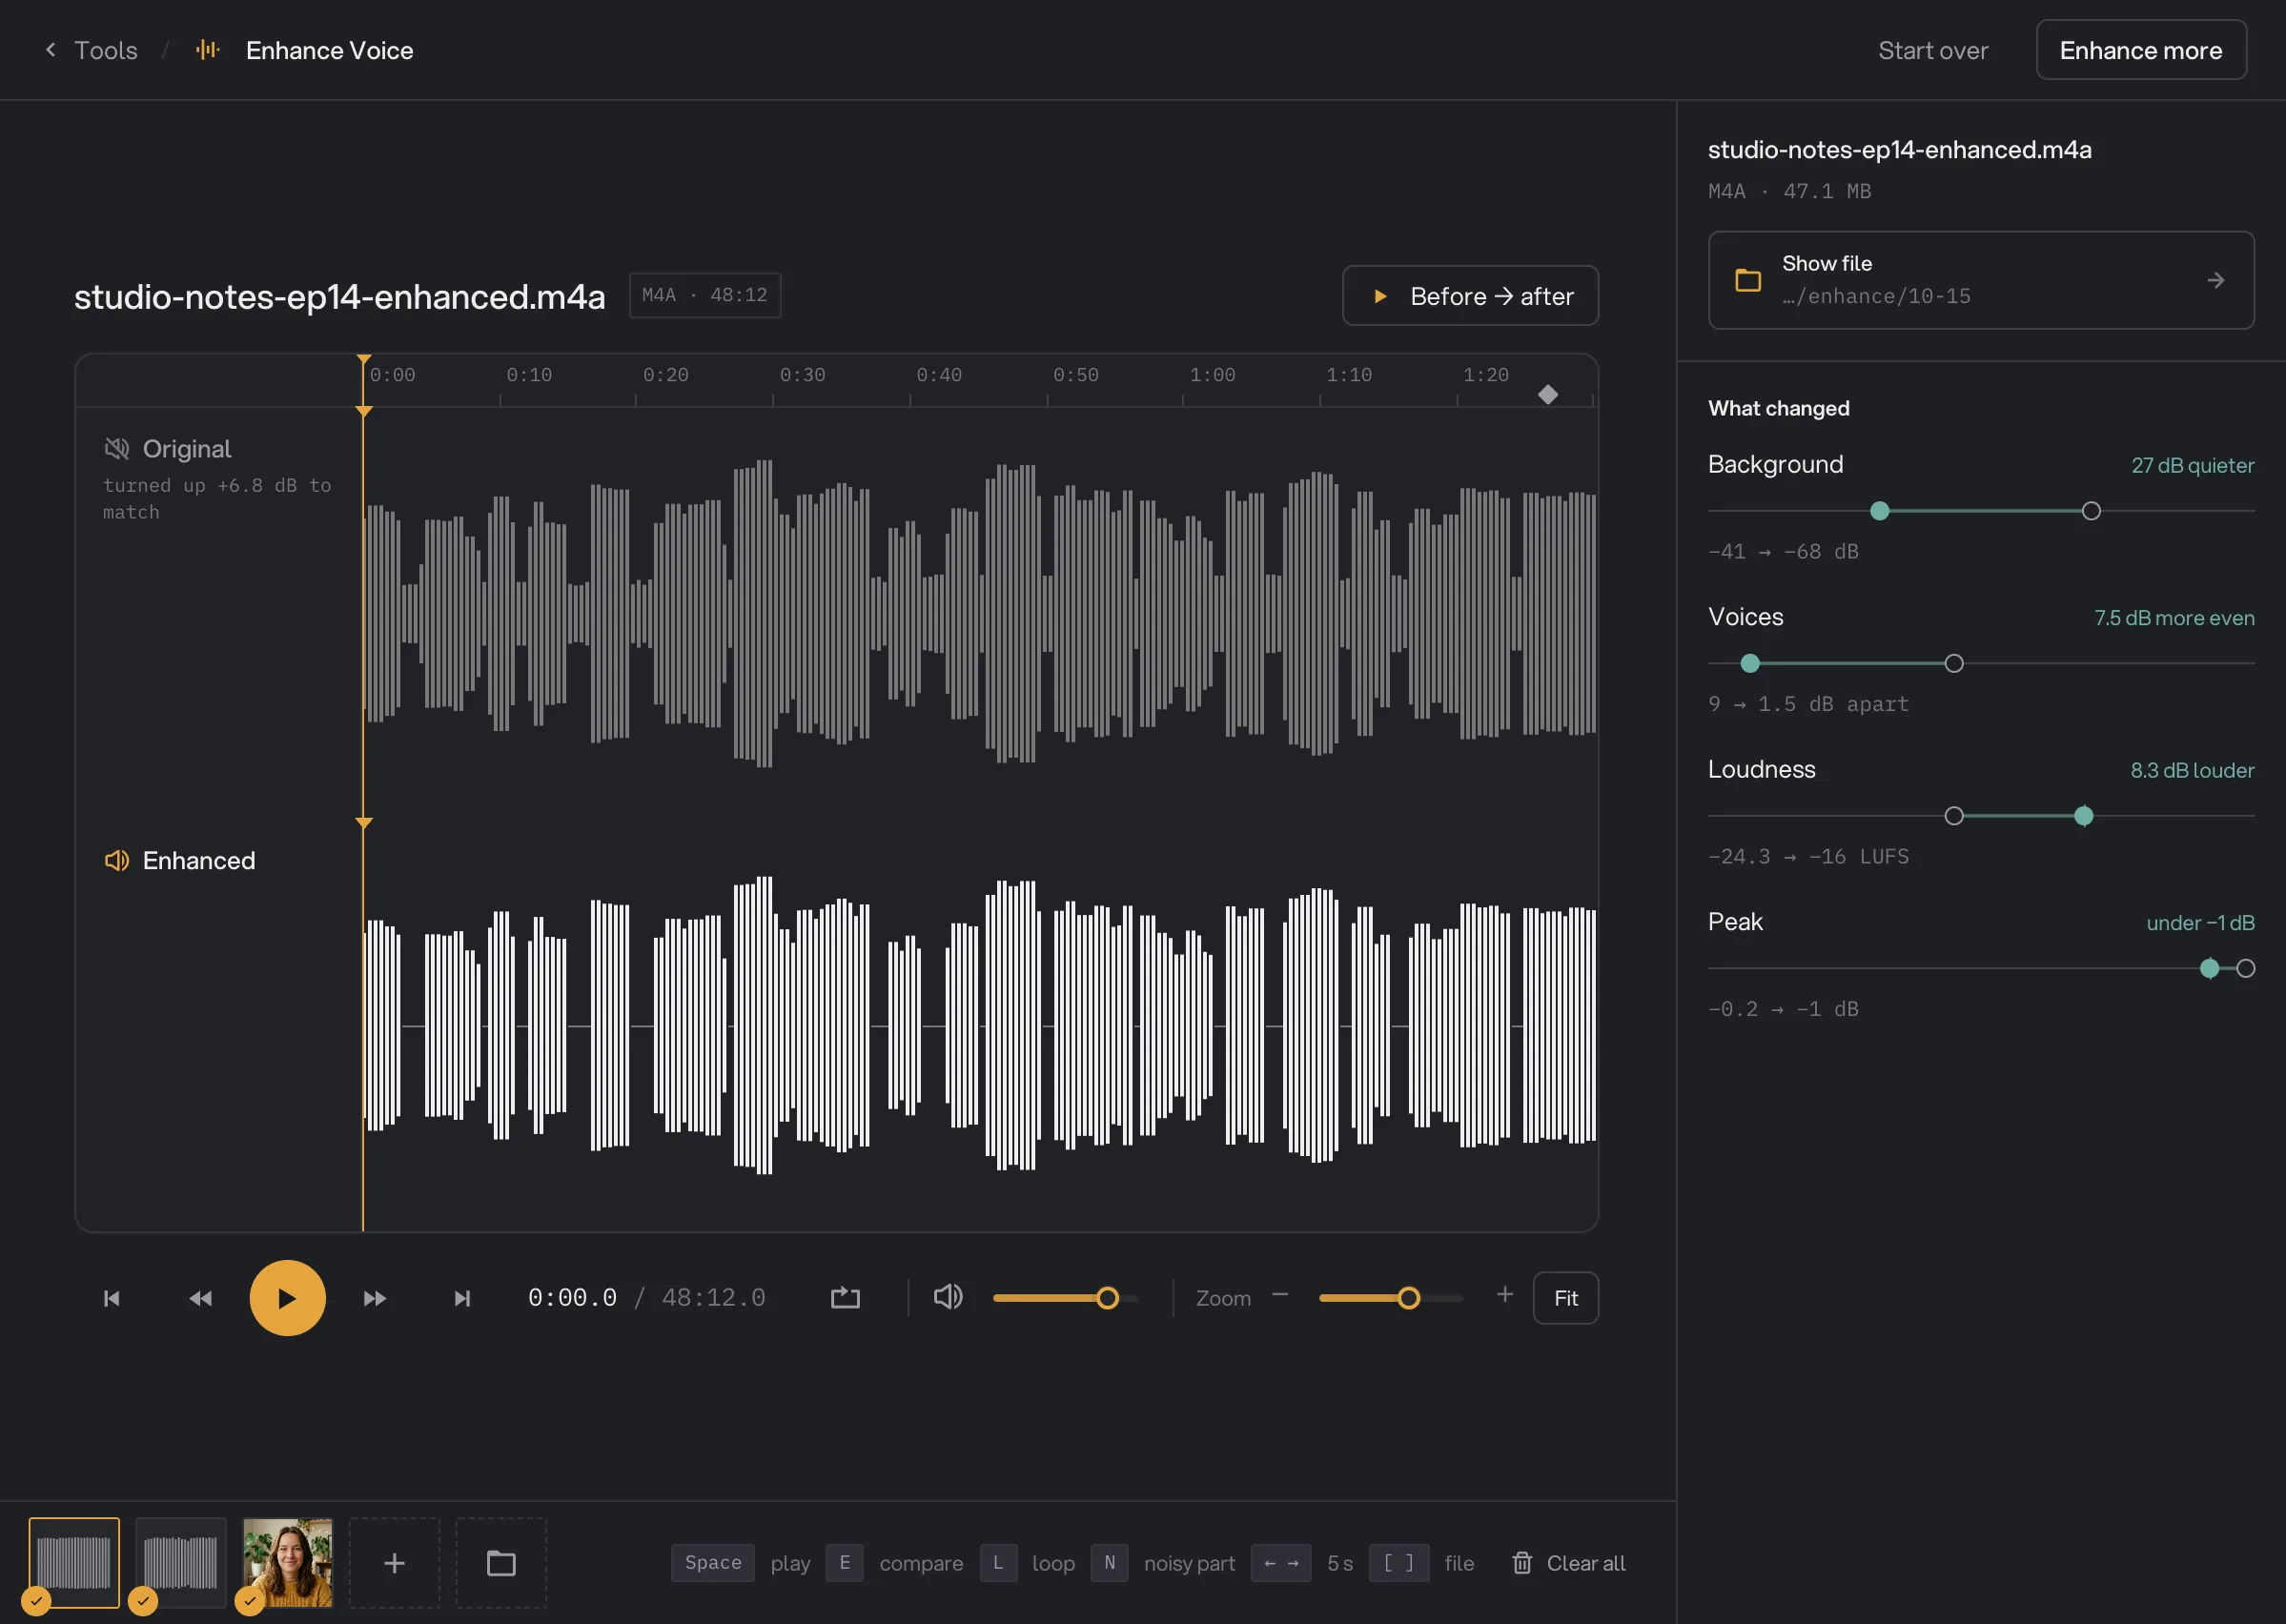
When the run ends, the top bar shows Start over and Enhance more, and the stage switches to the finished file, such as studio-notes-ep14-enhanced.m4a. The same deck plays it, with the same keys: play, jump, skip, loop and switch between Enhanced and Original as before. The original plays at the same loudness as the enhanced file, so a quiet recording is turned up to compare.
To hear the difference fast, click Before → after above the deck. It plays the loop box again and again, the original first, then the enhanced sound. With no loop box, it plays 6 seconds of the noisiest part of the file. Drag the box to hear another part. The button says which one you hear, such as "Now: before". Click it again to stop.
The settings panel now shows the result of the file on the stage: the new file’s name, its format and size, such as "M4A · 47.1 MB", and Show file, which opens its folder. Under What changed, each row has a small gauge, with a ring for before and a dot for after. The panel says "Measuring…" for a moment while it reads the new file.
- What changed
- Show file
- Before → after
- Start over
- Background: the level of the sound in the pauses, for example "27 dB quieter, −41 → −68 dB".
- Voices: how far apart the loudest and quietest phrases are, for example "9.1 → 1.5 dB apart".
- Loudness: how loud the whole file sounds, in LUFS, for example "−27.4 → −16 LUFS". The small tick is the loudness you chose.
- Peak: the loudest moment, in dB. The tick is the −1 dB limit.
A row shows only when its number changed enough to hear: 3 dB for Background, 1 dB for Voices, half a LUFS for Loudness. When none did, the panel says "Nothing changed enough to hear." Background needs a few seconds of pauses to measure, and Voices needs at least three phrases. Click another tile to see that file. A file that failed says "Couldn’t enhance this file." with the reason. A file Hangar left alone says "Nothing to change in this file.", and one the run stopped before says "The run was cancelled before this file."
Click Enhance more to go back to the settings with the same files, for example to try another Background level. The next run starts again from your original recordings. Click Start over to clear the files and begin with new ones.
Every setting, and when to change it
All files in the Studio share the same settings.
- Background
Removed keeps only the voice and makes the pauses quiet. Move the fader to keep the room under the voice, for a more natural sound.
- RangeRemoved, or -29 to -12 dB under the voice in steps of 1
- DefaultRemoved
- Even out voices
How much loud and quiet phrases and speakers are brought together. Off leaves the balance as it was recorded.
- RangeOff, Gentle, Normal, Strong
- DefaultNormal
- Loudness
How loud each finished file sounds. Keep leaves each recording at its own loudness. Custom sets your own target.
- RangePodcast (-16 LUFS), YouTube (-14 LUFS), Broadcast (-23 LUFS), Keep, or Custom from -30 to -10 LUFS in steps of 1
- DefaultPodcast
- Format
The kind of audio file you get. Video files always keep their own format.
- RangeSame as source, MP3, M4A, WAV, FLAC
- DefaultSame as source
What format do the new files use?
With Format on Same as source, each audio file is saved in a format close to the original:
- MP3 stays MP3, and Opus stays Opus.
- AAC, M4A and ALAC files become AAC (.m4a) at 192 kbps.
- WAV and AIFF become WAV.
- FLAC becomes WAV, which is larger. Pick FLAC under Format to keep FLAC.
- OGG, WMA and other formats become AAC (.m4a).
The other choices give the same format for every file: MP3 at high quality, M4A (AAC at 256 kbps), WAV (16-bit) or FLAC (lossless). A mono file stays mono. A stereo file stays stereo, with the cleaned voice the same on both sides. A file with more than two channels comes back as stereo.
A video keeps its own format, such as MP4 or MOV. The picture is copied as it is, with no quality loss, and so are its title and other details. The new sound is AAC at 192 kbps, or Opus at 160 kbps in a WebM file.
How do I get the best results?
- Listen to the hardest part. Press N to jump to the noisiest parts, or go to where the quietest speaker talks, before you run a batch.
- Start with the defaults. They suit most podcasts, interviews and voiceovers. Change one setting at a time and listen again.
- Keep a little room for video. When you can see the room, a voice with no room sound at all can feel odd. Try the Background fader around -24 dB.
- Enhance first. Run Enhance Voice before you trim pauses, split, transcribe or compress. Those tools all work better on a clean voice.
- Start from your best copy. Use the original recording rather than a small MP3 made from it, and shrink the result at the end with Audio Compress if you need to.
Why is the result not what I expected?
- The music or sound effects are gone. Enhance Voice keeps only speech, and treats everything else as background. Enhance the voice before you add music, or use Volume / Normalize for recordings with music.
- The pauses are completely quiet. That is what Background Removed does. Move the fader to the right to keep some room sound.
- The voice sounds thin or a little artificial. This can happen on very noisy or far-away recordings, where a lot is taken out. Move the Background fader to the right: some of the original sound comes back under the voice and the result sounds more natural.
- A quiet speaker is still too quiet. Set Even out voices to Strong.
- The voice sounds flat, with little difference between loud and soft. Set Even out voices to Gentle or Off.
- The file got louder or quieter. Loudness brings every file to its target. Choose Keep to leave the loudness as it was.
- The file is bigger than the original. A FLAC file came back as WAV, or a small compressed file came back as WAV. Pick MP3, M4A or FLAC under Format.
- The stereo sound is gone. The file is still stereo, but the voice is the same on both sides.
- The cover picture or title is gone. Enhanced audio files do not keep cover art or tags such as title and artist.
- A Background or Voices number is missing. It did not change enough to hear, or the file had too few pauses or phrases to measure.
Troubleshooting
- The deck says "Can’t open this file for listening." Hangar could not read the file. Check that the file plays in another app, or convert it with Audio Convert first.
- A line says "Couldn’t enhance part of this file, so the original plays there." Hangar could not enhance one part, and the reason follows. The rest of the file still plays enhanced.
- A file failed with a message that it has no sound. The file, often a video, has no sound track Hangar can read.
- A file failed with a message that the recording is silent. There is no voice to enhance. Check that you added the right file and that it plays.
- A file failed with "Enhance Voice needs a newer processor on this computer". The noise removal model needs processor features that some older PCs don’t have. Enhance Voice can’t run on that computer.
For other errors, see A file failed: what to check.
Limits
- Enhance Voice takes audio files, such as MP3, WAV, FLAC, AAC, M4A, OGG, Opus, AIFF and WMA, and video files, such as MP4, MOV, MKV, WebM and M4V.
- It is made for speech. Music under the voice is removed with the noise.
- All files in a run share one set of settings.
- Loudness has four set levels and Custom, from -30 to -10 LUFS. For a level outside that range, choose Keep and use Volume / Normalize afterward.
- Only the first sound track of a file is used. A video keeps its picture, but not its other sound tracks or subtitle tracks.
- Audio files do not keep cover art or tags. The new sound is 48 kHz.
- It works at about five times the speed of playback, so long recordings take a while.
- Everything runs on your computer. Nothing is uploaded.
Use Enhance Voice in a chain
Enhance Voice is available as a step in chains, under the Audio steps. It has the same four settings as the Studio, without the listening stage, and takes audio or video files. Leave Loudness alone, and each file gets Podcast loudness.
Put it first. Trimming silences, splitting at pauses, transcribing and compressing all work better on a clean voice. A video stays a video after this step, so follow it with video steps, or with Extract Audio to get the sound on its own. To run the same chain on every new episode, see Run a chain on many files.
Common questions
Does it work on music?
No. Enhance Voice is made for speech. Music under a voice is treated as background and removed with the noise. To change the loudness of music, use Volume / Normalize.
Why do Enhanced and Original sound equally loud when I listen?
On purpose. A louder version almost always sounds better, so Hangar plays both at the same loudness. What you hear when you switch is only the cleanup. The change in loudness shows as a number after the run.
Which loudness should I pick?
Podcast (-16 LUFS) for episodes and interviews, YouTube (-14 LUFS) for video, and Broadcast (-23 LUFS) when a radio or TV station asks for EBU R128. Choose Keep to leave each recording as loud as it was.
Can I keep some of the room sound?
Yes. Move the Background fader to the right. The room stays under the voice, from 29 dB down to 12 dB quieter than it.
Does it need the internet, an account or a download?
No. The noise removal model comes with Hangar and runs on your computer. Nothing is uploaded, and there are no credits or minutes to count.
Is my original changed?
No. Hangar saves a new file, with "-enhanced" added to its name, in your output folder and leaves the original where it was.
Still stuck?
One person reads every message, usually with a reply within a day.